

For an upcoming exhibit at the Lexington Historical Society, I am building a model of a house in Lexington that was built as part of the mid-Century Modern style.
This page records my thoughts as I created this model. I started thinking about this project in November 2014 when Rick Beyer and Elaine Doran approached me and asked if I was interested in creating a model for an exhibit to be staged by the Lexington Historical Society in May of 2015. They asked me based on my prior efforts in creating paper models of historic houses in Lexington. But, they wanted the model to be much larger than I had ever done in paper, and I decided to somehow use foamcore so that the sides would be stiffer.
The exhibit got postponed until June (good thing). Here are some milestones:
What follows are notes of my thoughts and changes in plans as I worked on this model. Lot's of things changed as I went through the process of exploration, design, experimentation (anybody need a lot of unneeded coffee stirrers?), iteration, test builds, and finally building the actual model.
I have learned a lot, which for me is the reward of doing this.
In all of the photo galleries below, move your pointer over a thumbnail to see a caption, click on the thumbnail to see a larger size of the picture.
This page records my thoughts as I created this model. I started thinking about this project in November 2014 when Rick Beyer and Elaine Doran approached me and asked if I was interested in creating a model for an exhibit to be staged by the Lexington Historical Society in May of 2015. They asked me based on my prior efforts in creating paper models of historic houses in Lexington. But, they wanted the model to be much larger than I had ever done in paper, and I decided to somehow use foamcore so that the sides would be stiffer.
The exhibit got postponed until June (good thing). Here are some milestones:
- November 15, 2014: Took my first photographs of the house. I went back several additional times.
- December 28: Made my first Sketchup model of the house
- January 15, 2015: Left Lexington for the South for an 8 week vacation
- March 15: Returned from vacation.
- April 6: Started making Sketchup model changes again.
- Too many points to list ...
- June 12: Made last design changes.
- Frantic, all consuming, activity to finish the model: this is one of the few times I've actually "finished" a model...
- June 17: Delivered model to Lexington Depot with just a few touchups to complete.
- June 19: Exhibition opens.
What follows are notes of my thoughts and changes in plans as I worked on this model. Lot's of things changed as I went through the process of exploration, design, experimentation (anybody need a lot of unneeded coffee stirrers?), iteration, test builds, and finally building the actual model.
I have learned a lot, which for me is the reward of doing this.
In all of the photo galleries below, move your pointer over a thumbnail to see a caption, click on the thumbnail to see a larger size of the picture.
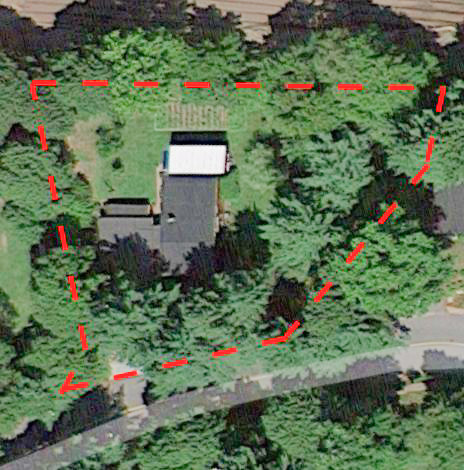
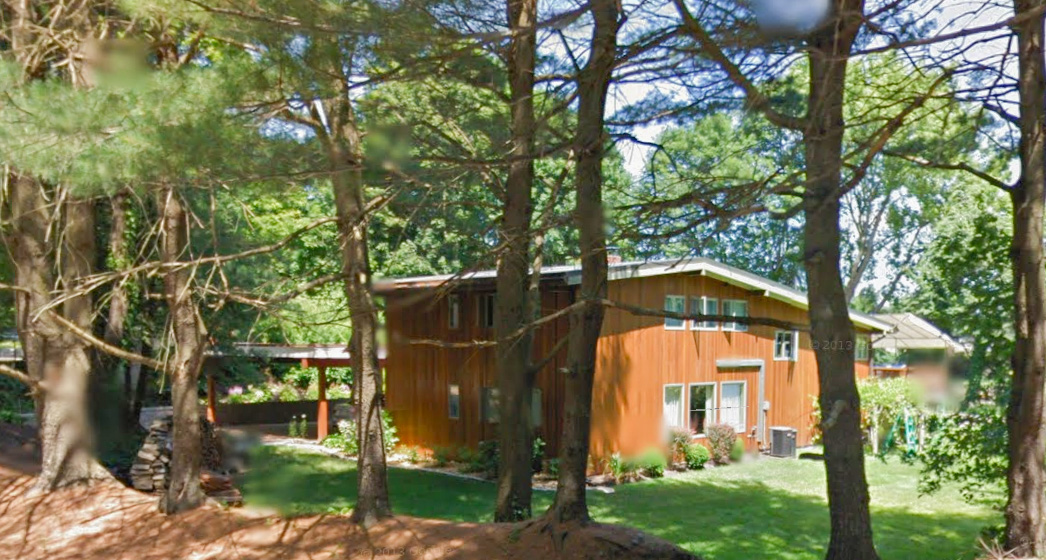
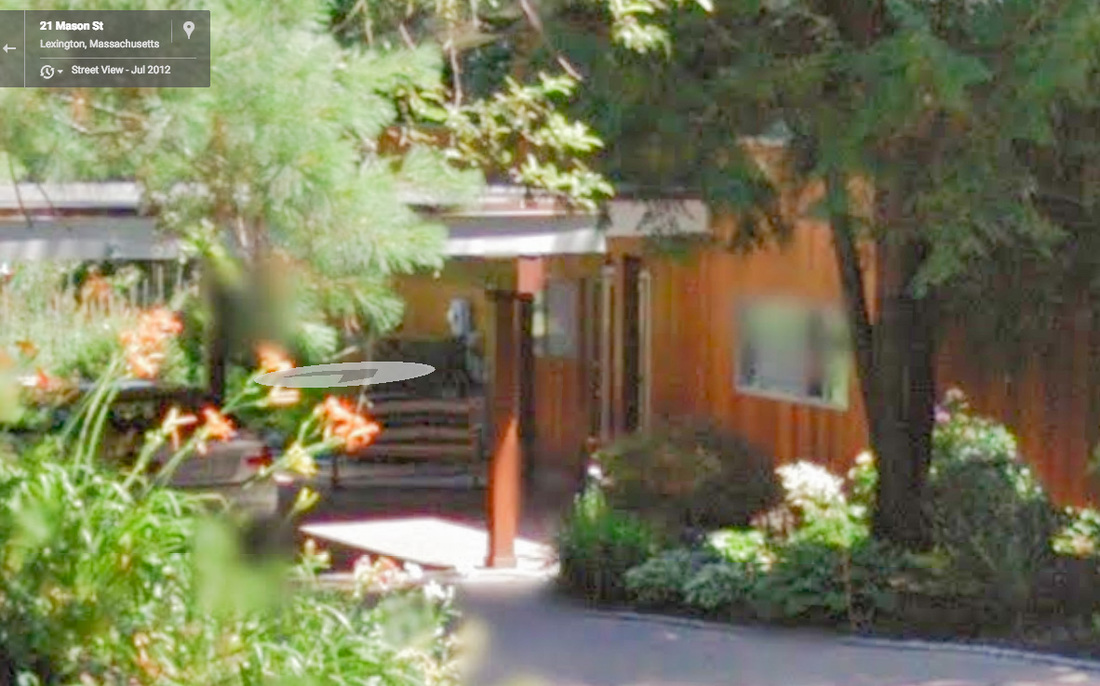
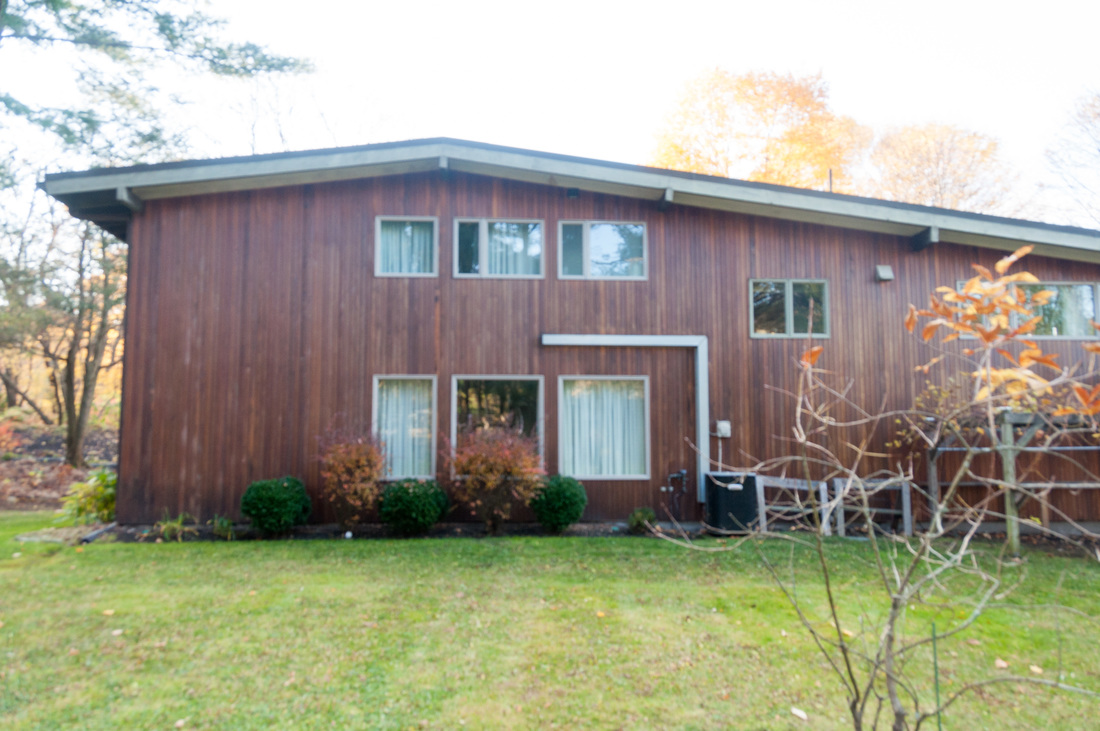
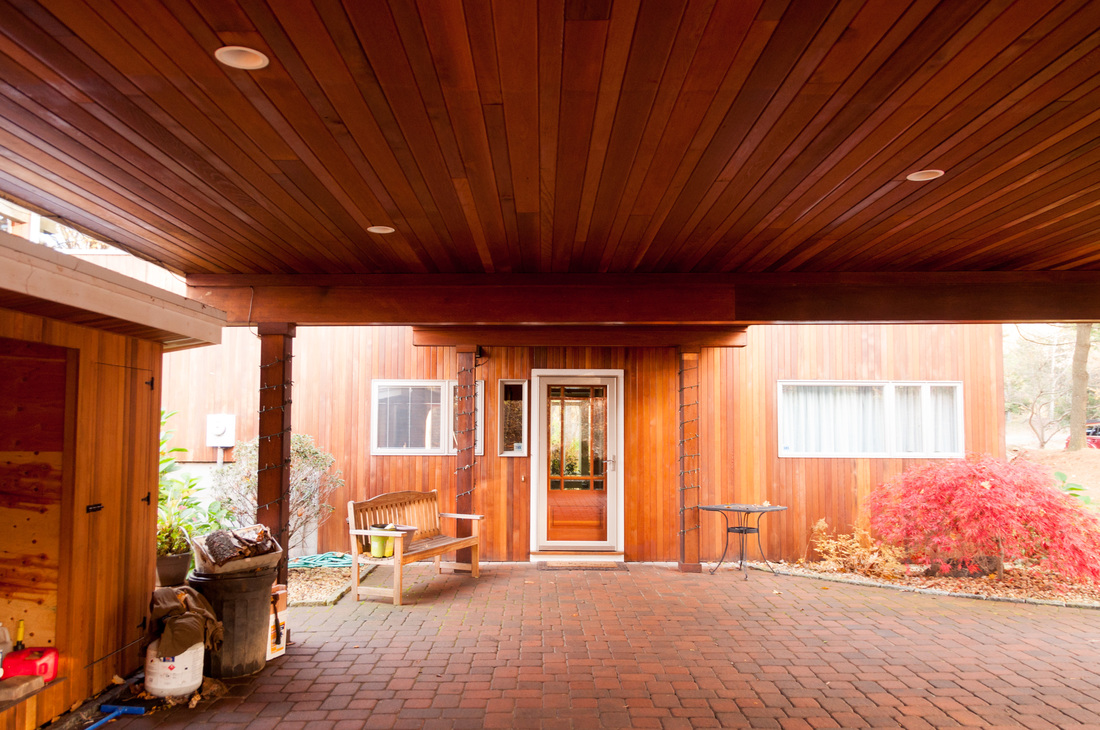
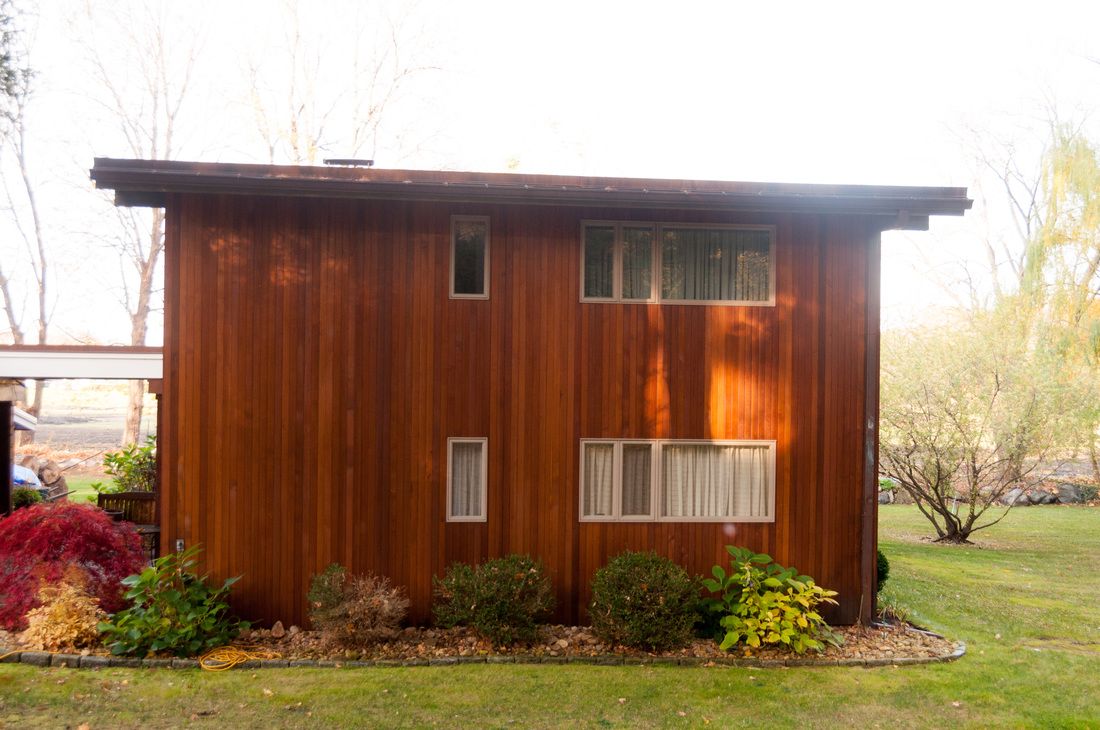
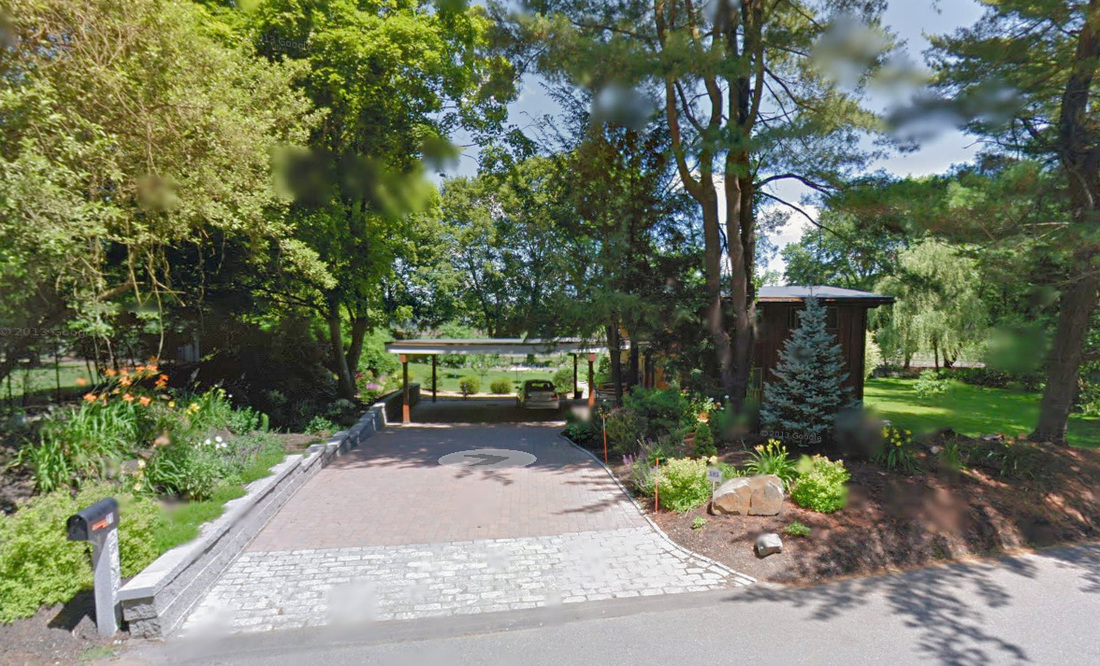
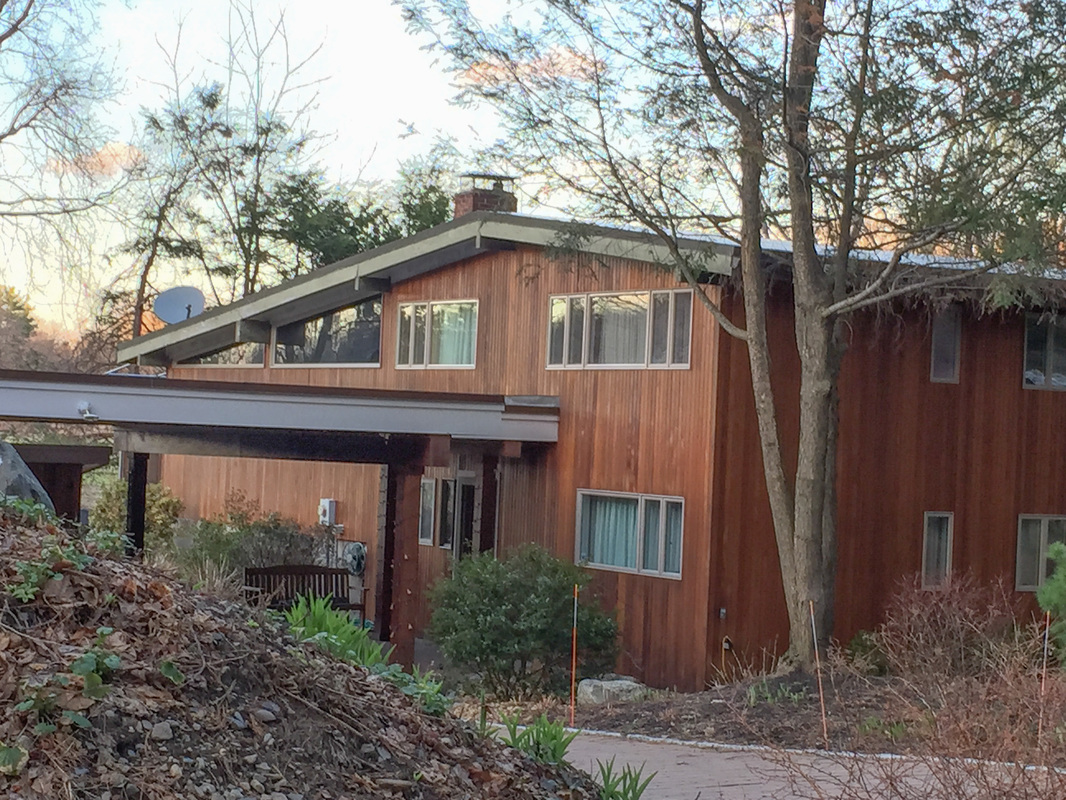
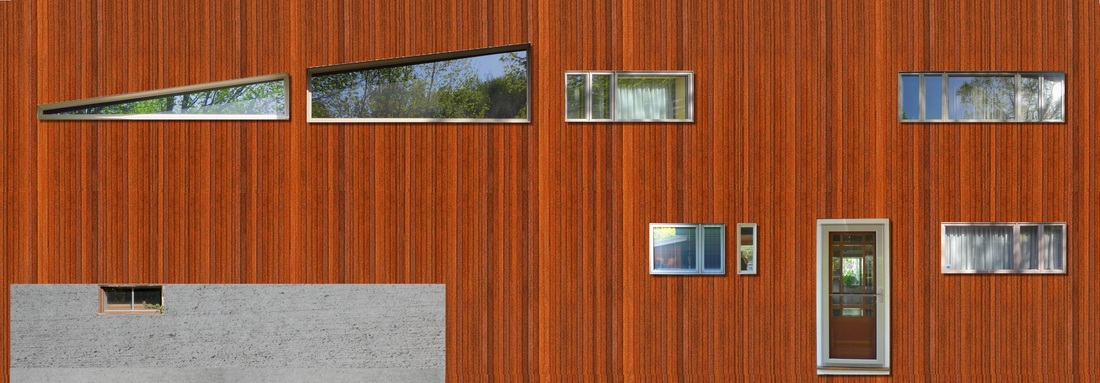
Photographs of the house as it exists in 2015 after several alterations.
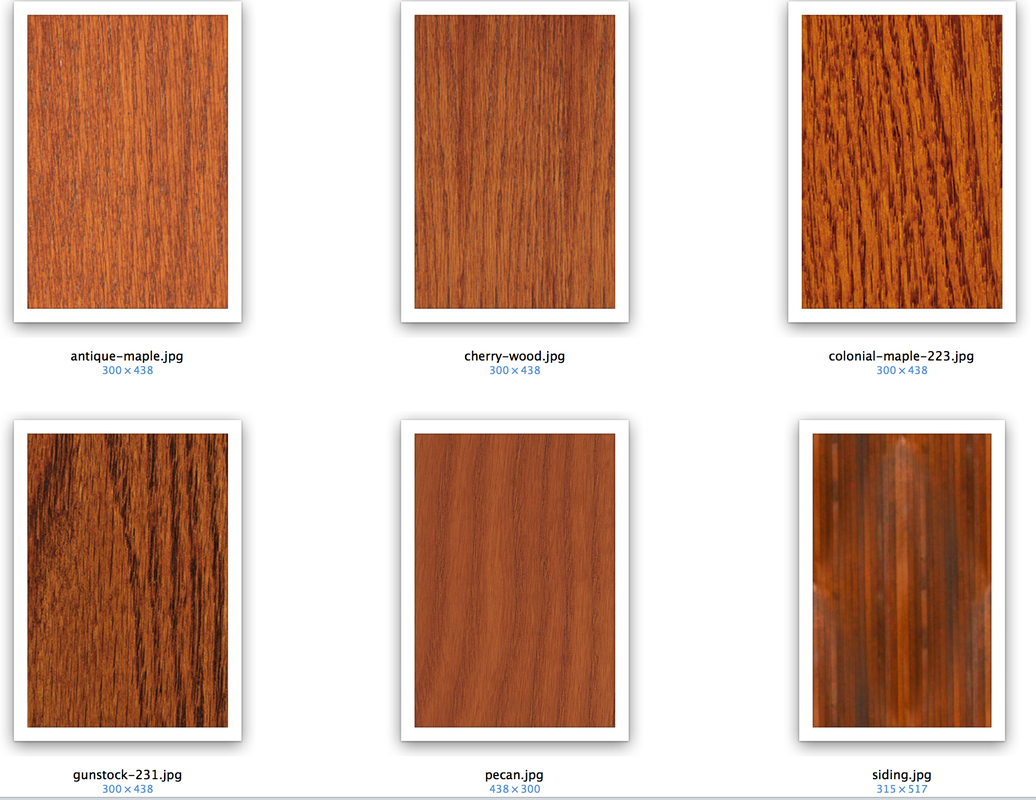
These are a combination of photographs I took of the house, plus images that I grabbed from Google Map street views, as well as a couple of color charts of wood colors to match with the siding.


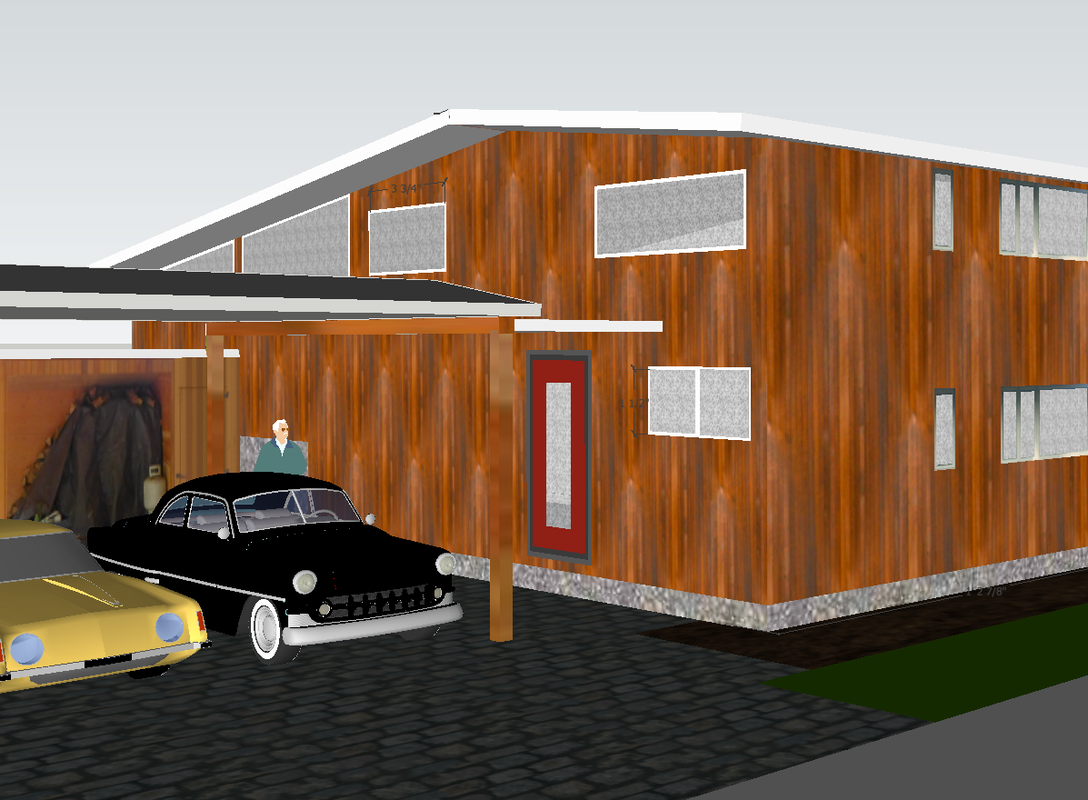
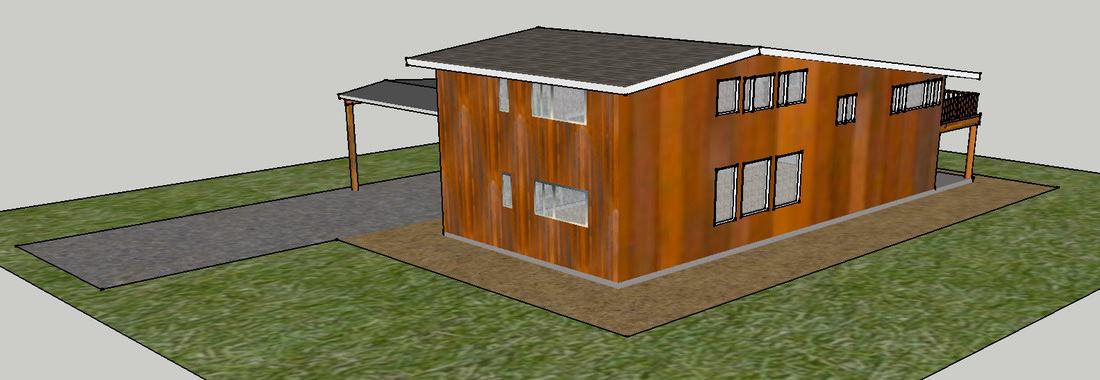
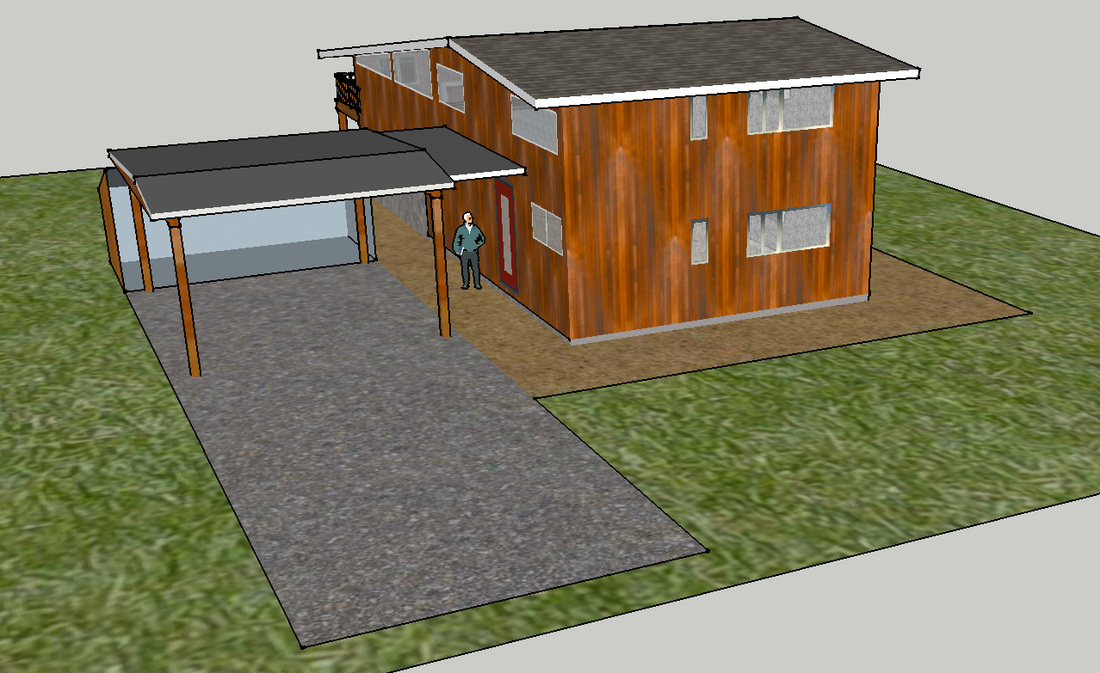
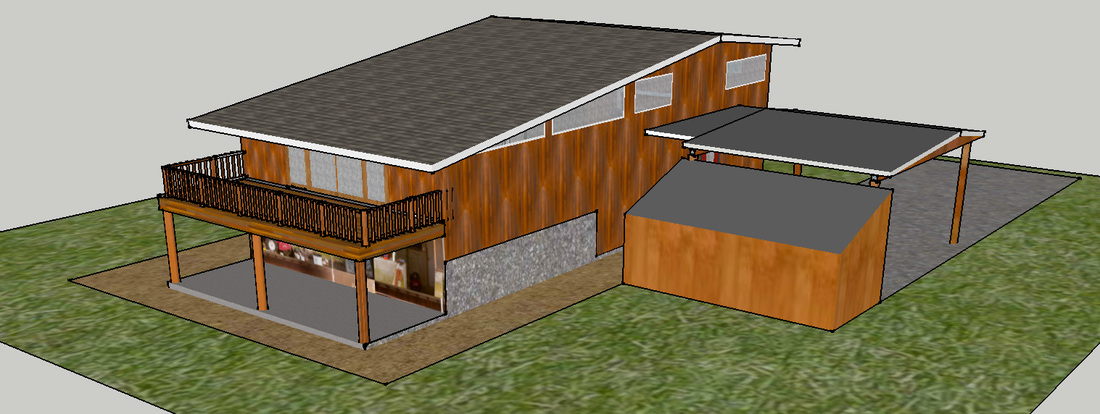
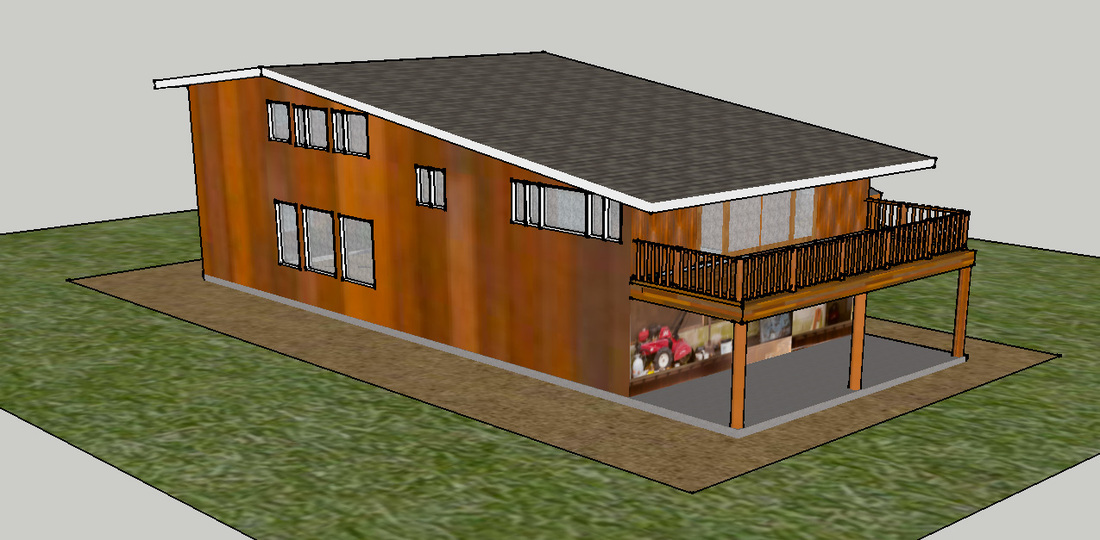
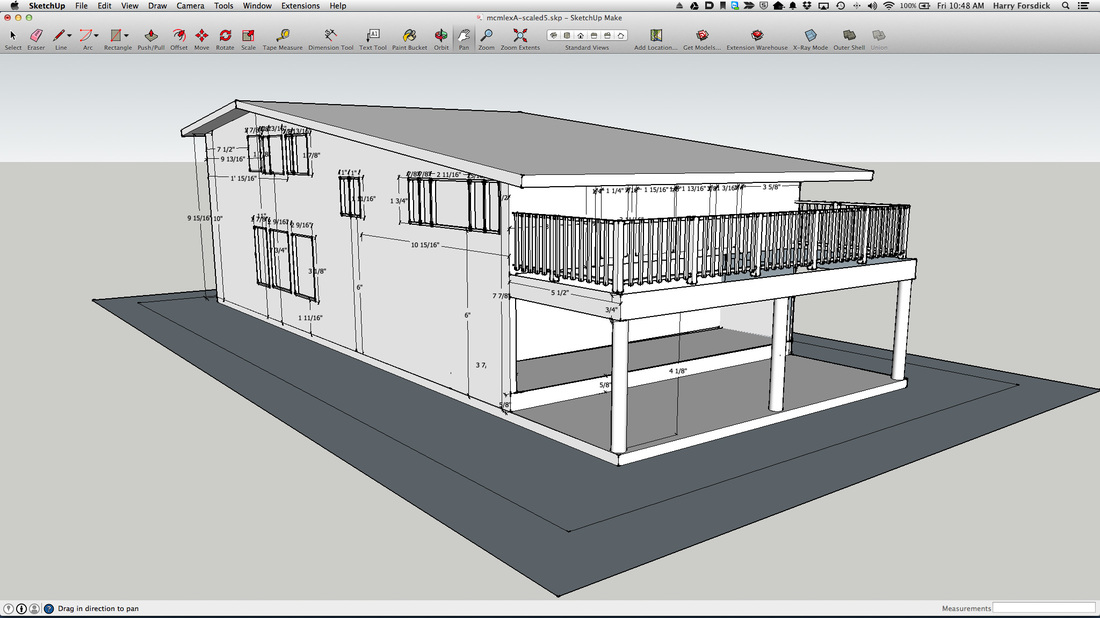
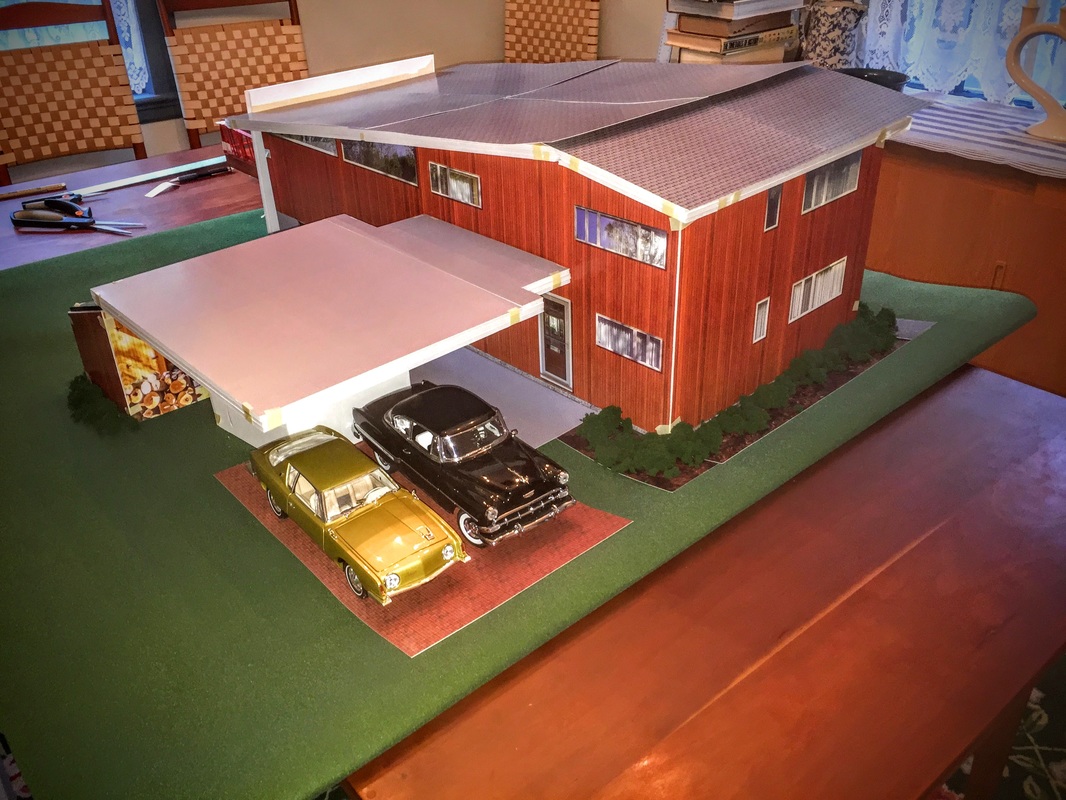
Model with color finishing, and additional back deck, carport and storage shed.
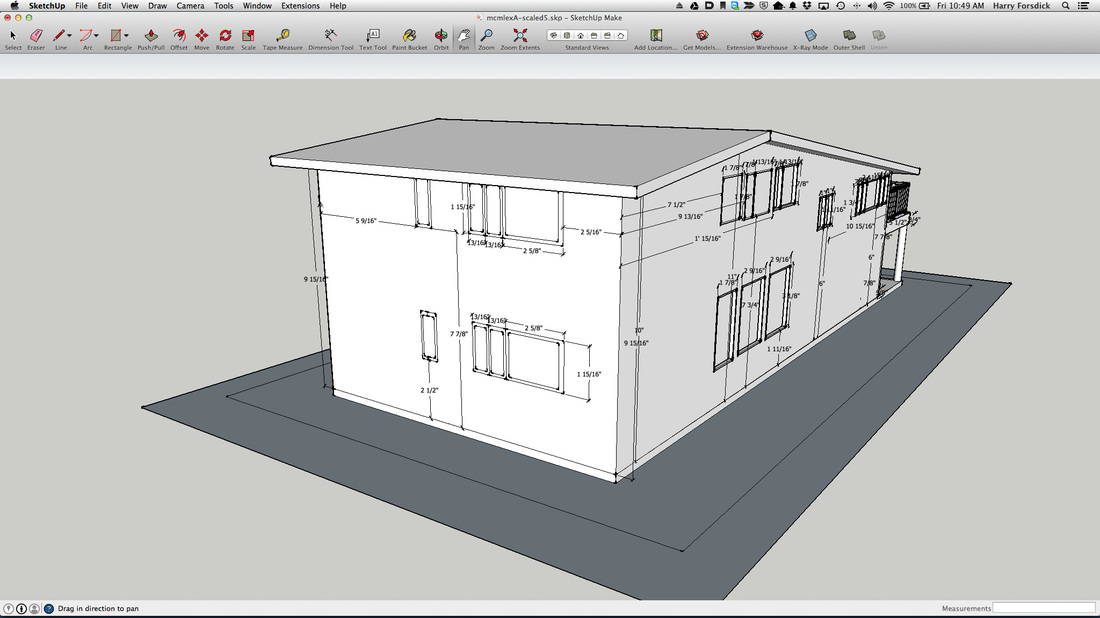
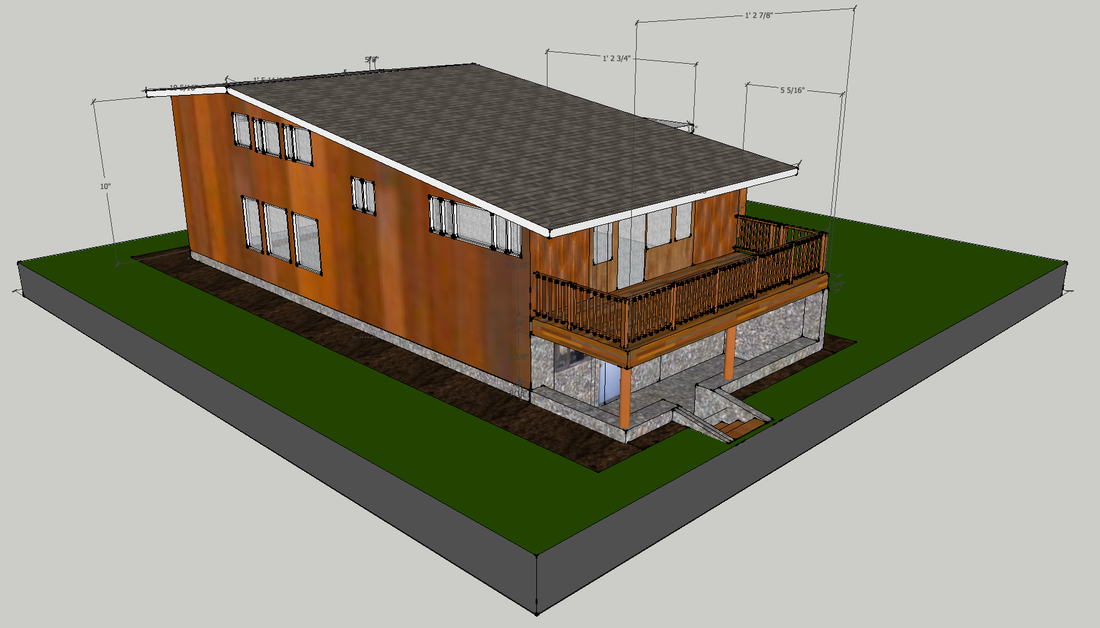
Over several months, I took measurements from the photographs above and built up the model below in Google Sketchup. This free program allows me to work out all of the details of building a model, regardless of scale or model construction materials. At first I thought about paper, but later realized that at the size we wanted, it would have to be built out of something sturdier. 3/16" foamcore turned out to be the best choice for a 1:18 scale model.
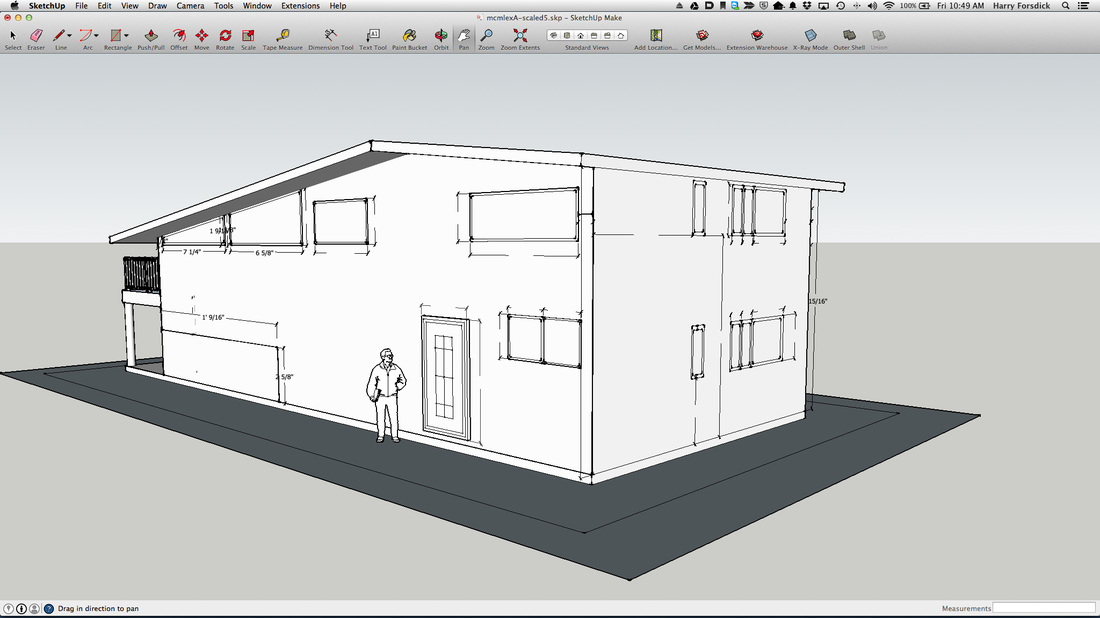
Plain white surfaced model
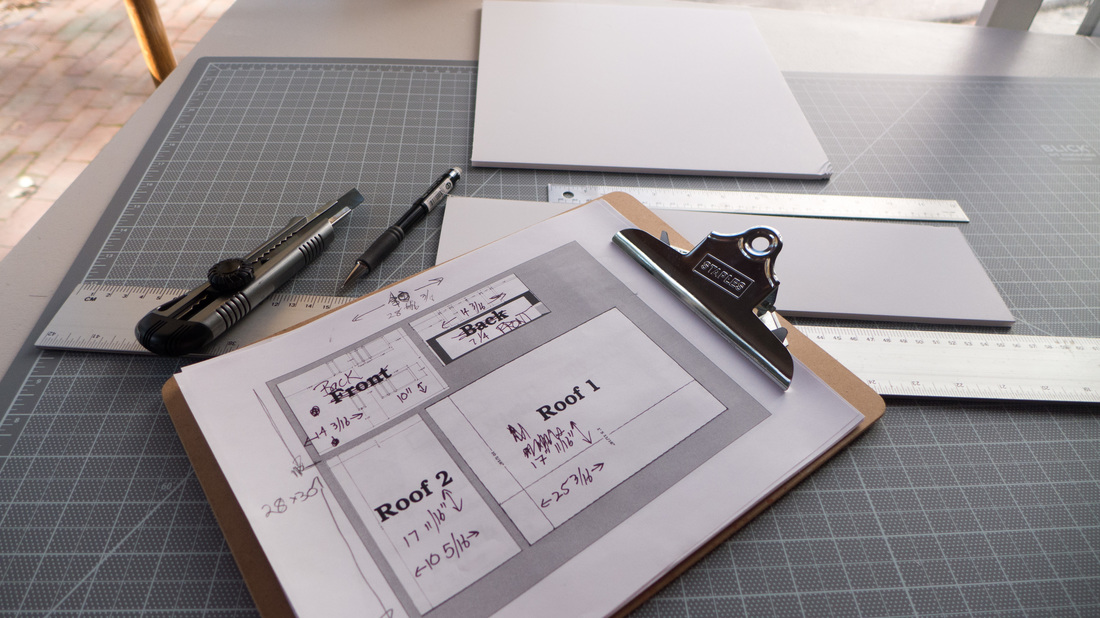
Now it looks pretty good in Sketchup. At this point, the scale of the model is 1:1, i.e., the true dimensions of the house. Initially I tried a 1:18 scale for building the model. This makes the footprint of the house+roof overhang and back porch to be about 37" x 18".
Building the model
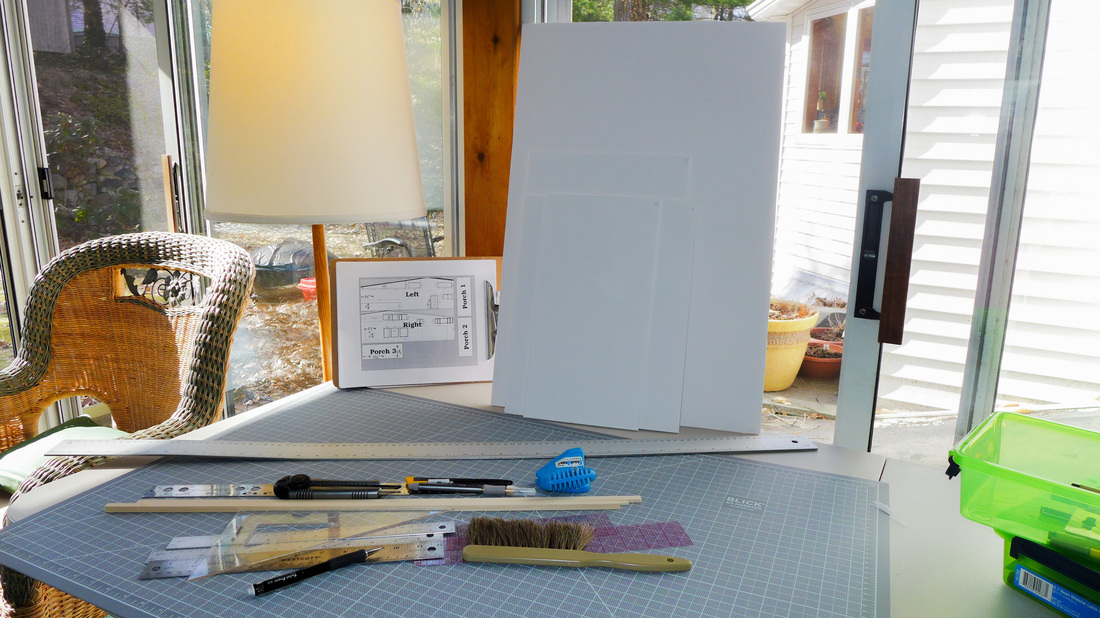
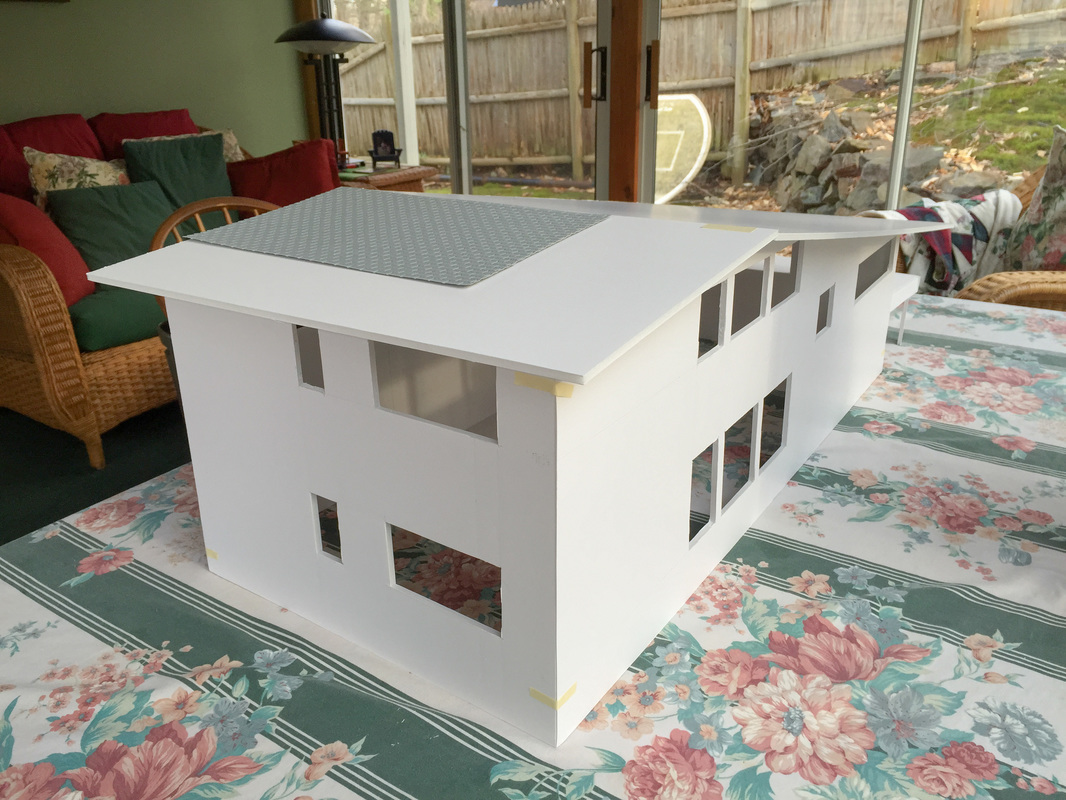
First Assembly of Foamcore
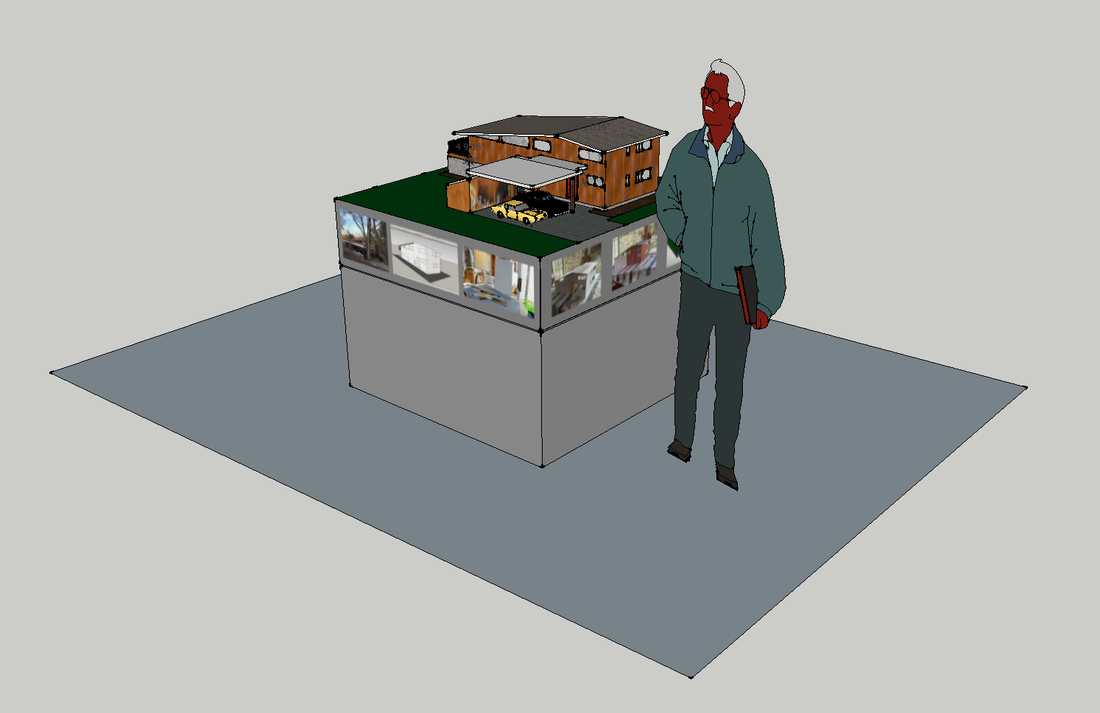
Even after cutting out the pieces, I couldn't quite appreciate the exact volume until I put the pieces together with masking tape. I convinced the lovely but always suffering Marsha Baker to pose besides the model for size comparison. I am eternally thankful for her willingness to look beyond my crazy projects that do nothing to complete all of the repairs needed around our house...

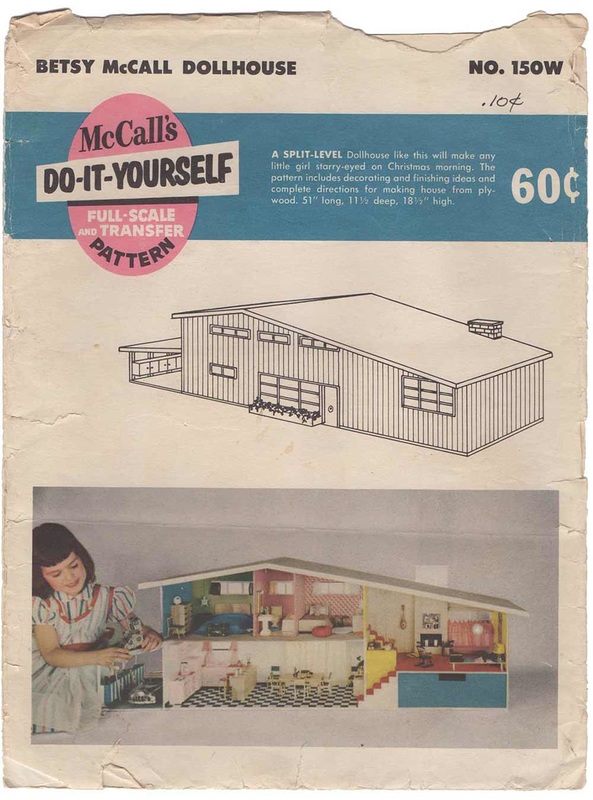
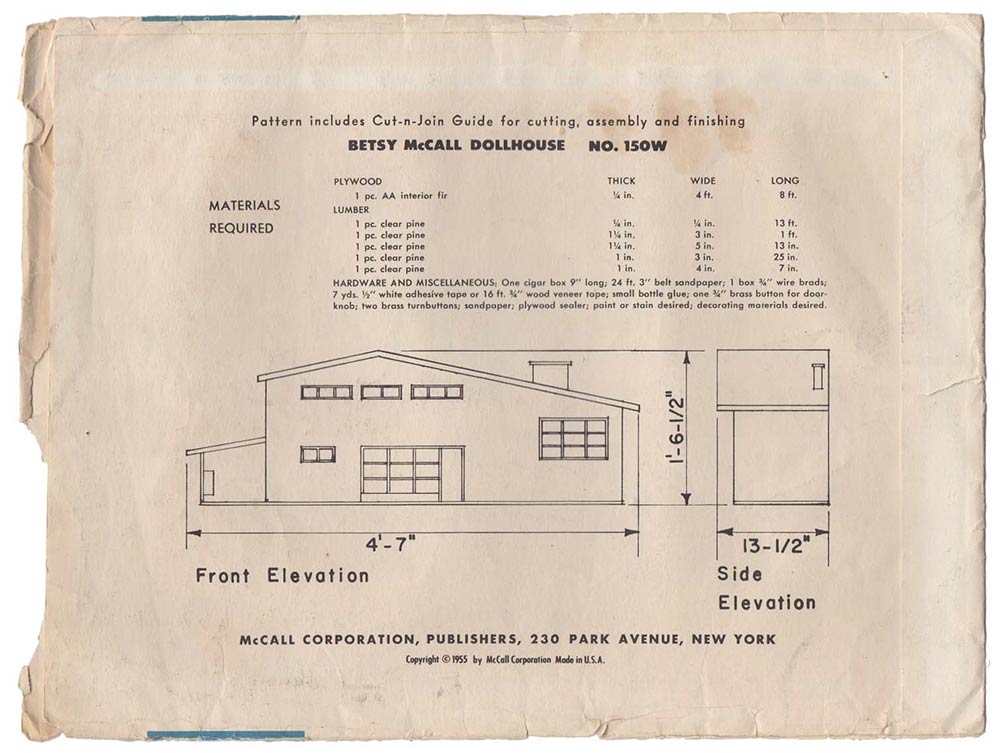
Similar Models
When looking around the Internet for ideas about how to build this model, I spent several days looking at plans for the Betsy McCall doll house -- a doll house that was popular in the late 50's and early 60's. This toy was developed by the McCall clothing pattern company.

Siding
After scouring the Internet, I found the ideal siding material: Trophy brand Craft/Stir sticks: 4.5" x 3/8" which when the round ends are removed, are the equivalent at 1:18 scale of 6' x 6.75" boards -- pretty close to the real thing. So the trick is how to remove the round ends of the sticks. After trying various methods including
and finally,
So, it just goes to show that it takes a couple of tries before you get the right solution.
- utility knife (too hard and after fatigue, dangerous),
- paper cutter (wood too hard),
- going to a woodworking store (no solution, but recommendation that I go to an auto body shop to see if they would use their hydraulic metal shear to cut off a long row of the ends),
- talking to the auto body guy who said such a metal shear was actually not very sharp, but that he thought an electric drill with a grinding sanding surface followed by smaller sandpaper would do the tick
and finally,
- coming home, ready to get out my electric drill when I notice a small, but very sturdy Frisker's AA0112 shear sitting in my box of craft tools. I try it out on the end of one stick and with a moderate amount of pressure it cuts the rounded end off leaving a little bit of compression on the stick end, but perfectly reasonable.
So, it just goes to show that it takes a couple of tries before you get the right solution.
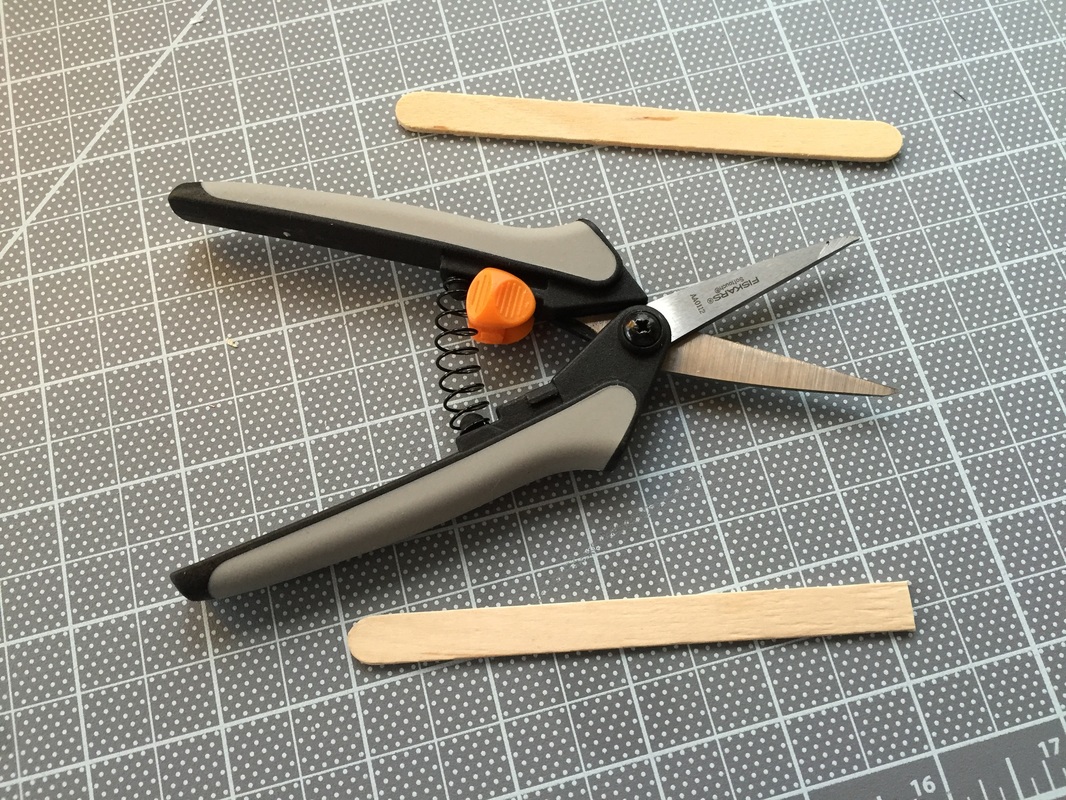 Popsicle stick at top, Frisker's AA0112 shears and popsicle stick with one end cut off. With both ends gone, the sticks measure 4" long by 3/8" wide. | 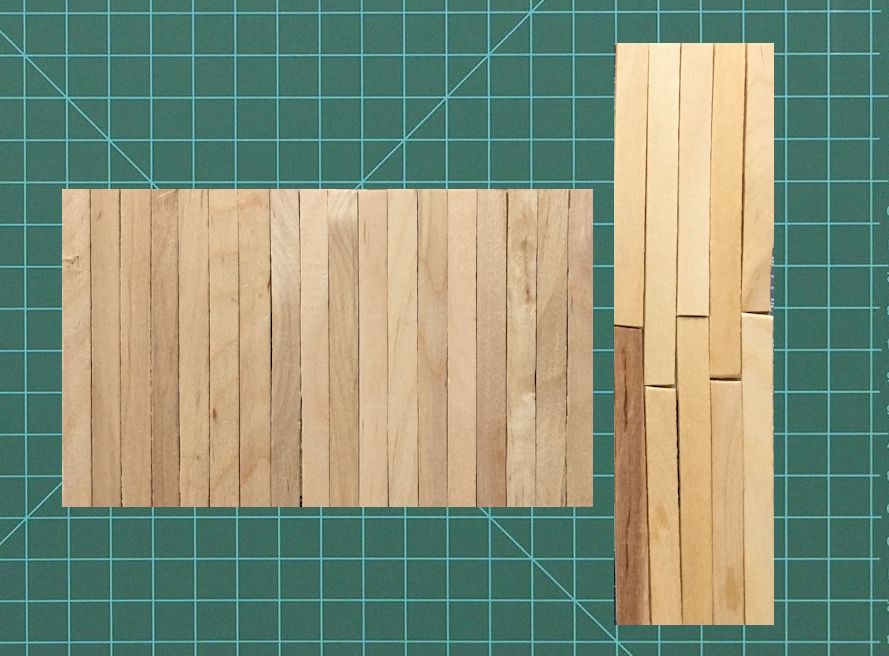 By aligning multiple boards and placing masking tape on the back you can get panels that are easy to handle. realistic runs of boards with different lengths give a natural pleasing appearance. |
Siding Color
 |  | |
One of the things that delighted the group of people who were selecting which house to use as the basis for the model was the finish on the siding. The beautiful cherry or pecan stained wood siding certainly made the house distinctive. So that challenge is to find the right stain for the popsicle stick wood to achieve the same look.


Cutting holes for doors and windows
Today's the day where I make the next cuts on this model. My plan is to cut the holes for the windows and door, then build the frames and surfaces of the windows out of basswood (painted or stained white) and plexiglass or frosted plexiglass). Then I can insert the windows into the holes in the walls to see how they look. The windows are pretty simple, the door is a little more complex and I will build it as I go.

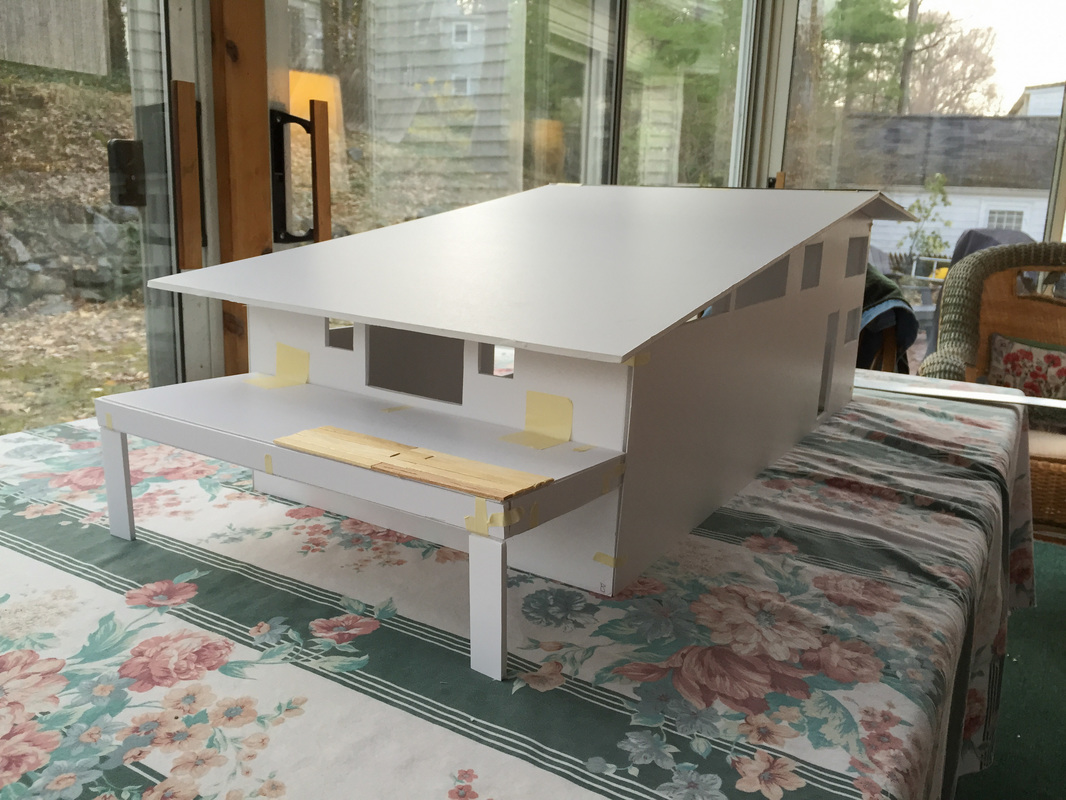
Back Porch: The Platform
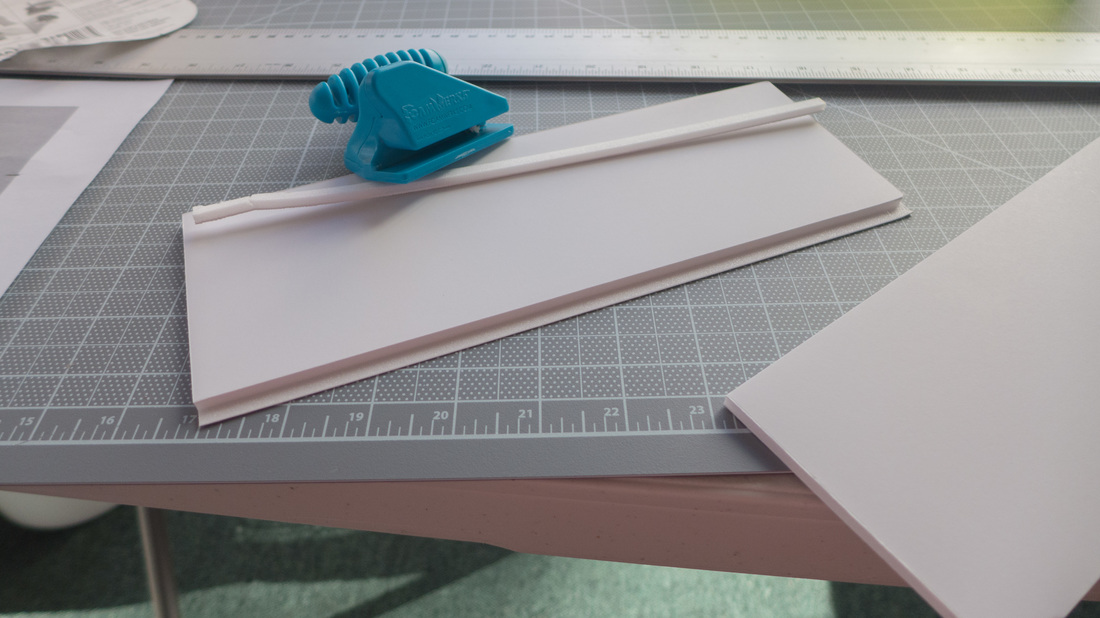
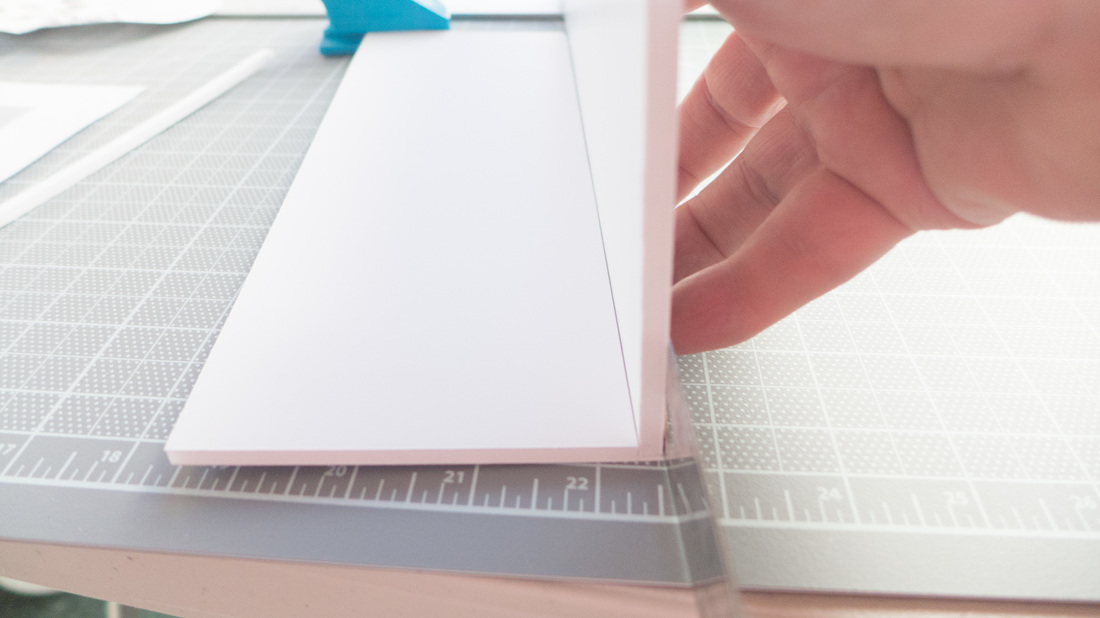
There are two strategies to building the deck (14 1/8" x 5 1/2" x 3/4") of the porch. First, I could cut 4 pieces of foamcore so that the thickness would be 3/16 x 4 = 12/16 = 3/4 inch. The problem with this is that the edges will show the foam part of the board. A second approach would be to build a box with rabbits cut from the top and bottom of the deck. This would work just fine. But after trying this I think I have come on a better approach: measure out a piece that is 14 1/8" x (2*(5 1/2") + 2*3/4") then cut V-grooves so that I can fold the edges to form the deck without the ends. Then cut two 5 1/2" x 3/4" pieces for the open ends, using a rabbit around all edges to make a tight fit. Fewer joints to screw up. The following video shows the tool I plan to use to cut the V-groove.
The Roof and Cross Beams
Although one sheet of 3/16" foam core will cover the house, it looks too thin to me, so I am planning on building it up, making a box using the rabbit technique. More on this when I start building / rebuilding these two items
Siding, Windows and Doors
My initial plan was to model the siding, windows and doors by building up actual physical miniatures of the siding from popsicle sticks, windows and door frames using narrower wooden coffee stirrers, glass in windows using thin plexiglass and then to insert the windows and door into holes cut in the foamcore. In fact, I cut the holes in the foamcore in preparation for building up the windows and door frames and then inserting miniature plexiglass windows and painted wooden door. After experimenting a little with other approaches, I'm sorry that I cut the holes and glad that I didn't spend too much time creating siding with the popsicle sticks.
One of the major attractions of this house was the natural stained wooden siding which had weathered naturally over many years. The problem when modeling this is to create the variabality in color, texture and the sense of it being vertical boards. I first worked on the color, consulting the Minwax color charts for wood stains (see above). I eventually settled on some combination of cherry and pecan which adds a little yellow to the red-brown of cherry. So, here is the progression of how I arrived at the final technique for doing the siding.
One of the major attractions of this house was the natural stained wooden siding which had weathered naturally over many years. The problem when modeling this is to create the variabality in color, texture and the sense of it being vertical boards. I first worked on the color, consulting the Minwax color charts for wood stains (see above). I eventually settled on some combination of cherry and pecan which adds a little yellow to the red-brown of cherry. So, here is the progression of how I arrived at the final technique for doing the siding.


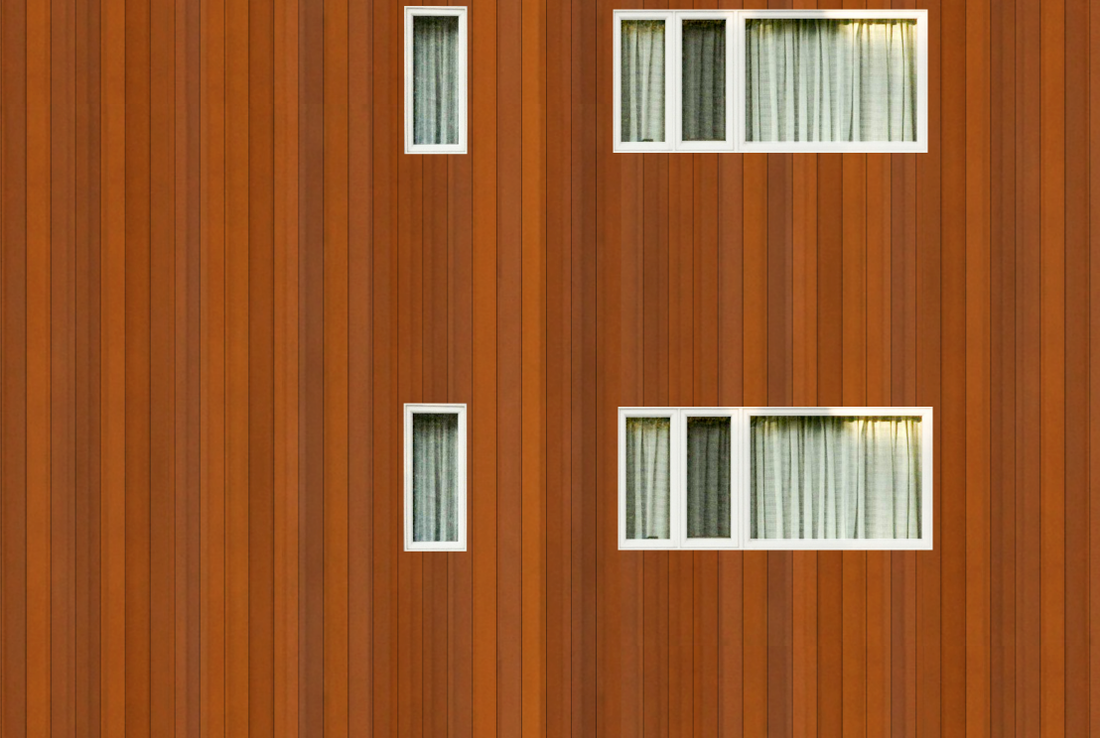
Without all of the details, I have concluded that I will be able to create a more visually realistic model by use of high resolution photography and printing with a semi-gloss printing finish. When combined with some trompe l'oeil techniques (mostly added shadows) the overall effect will be quite realistic. Here is an example of the impact of false shadows on giving the impressing of 3-dimensionality.


Progress as of April 24, 2015
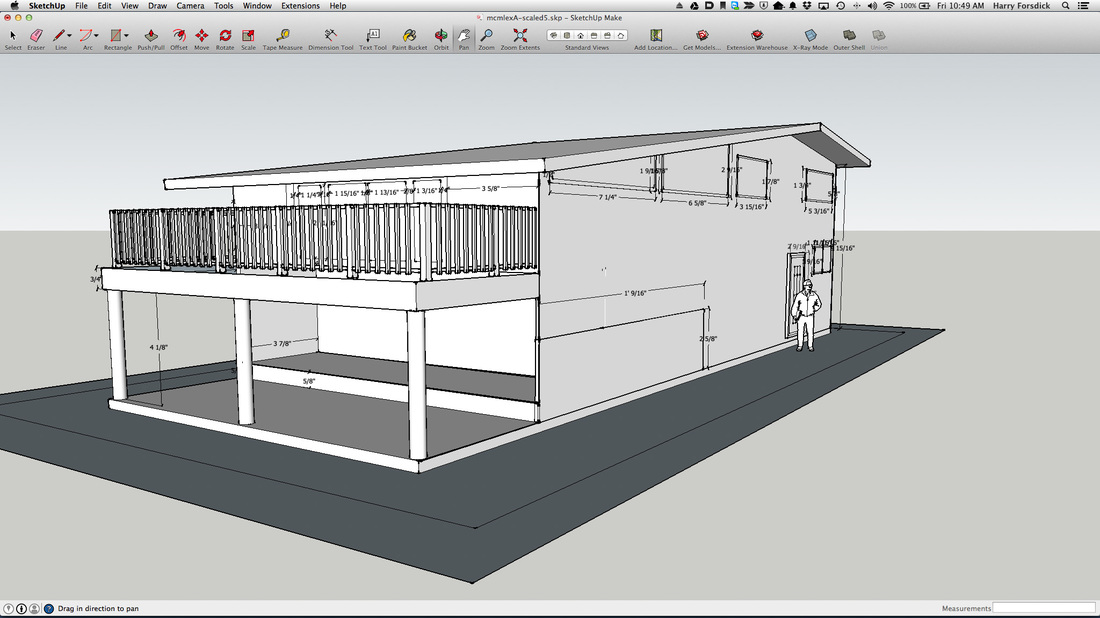
I think I have figured out how to do most of the things I need to do for this model: The model as done in SketchUp, the foamcore structure, the siding, windows and doors, the roof (including adding thickness and beams to the roof), the porch and porch railings (an actual miniature railing made out of basswood), the beams,the chimney, the slab foundation base (attach foamcore of house to a 3/4 inch perimeter of gray (concrete) foamcore, the immediate area under the eaves where low shrubs are planted and the grass beyond that made out of one more piece of foamcore. If I make the carport, driveway and tool shed, it will be more of the same techniques I have developed so far. So, here are several views of the model and a view of the actual structure. From the comparison of the second row, I suspect there is a problem in the length of the house: notice the difference in the spacing between the two sets of windows at the top of the left side of this house. This can be remedied by a trip over to measure the length and width of the foundation. At the same time, I will take another set of photos of the windows and door to make sure I have excellent images of these components. I may decide to add a little more detail to the windows by applying white strips of wood frame on top of a piece of plexiglass pasted on top of the printed white frame and curtains of the windows. This will give the model more depth as well as provide the shininess of the glass in the window. As it turns out, making all of these changes will take much less time than the design and creative parts of figuring out the best way to build this model, and models like this, so this is definitely not time wasted.

May 2: End of Experimentation and Design
I am now ready to build the model. But wait, what have I been doing since April 14th??? I now realize I have been in my usual exploration, learning, design, and experimentation phase of a project: laying the groundwork to getting it right. Along the way, I have learned the following things:
So, now I have taken apart all of the tests and experiments and am about to measure and cut the entire model again, this time armed with the things I learned since the middle of April.
- In a model this big, accurate measurements make a big difference in parts fitting together.
- Seeing the actual size of a model helps you understand the issues you face and techniques you can use.
- Masking tape is a great tool to attach things in "draft" form. Get some wide (1 1/2") masking tape and use your sharp knives and metal rulers to cut into many smaller strips that can hold parts together.
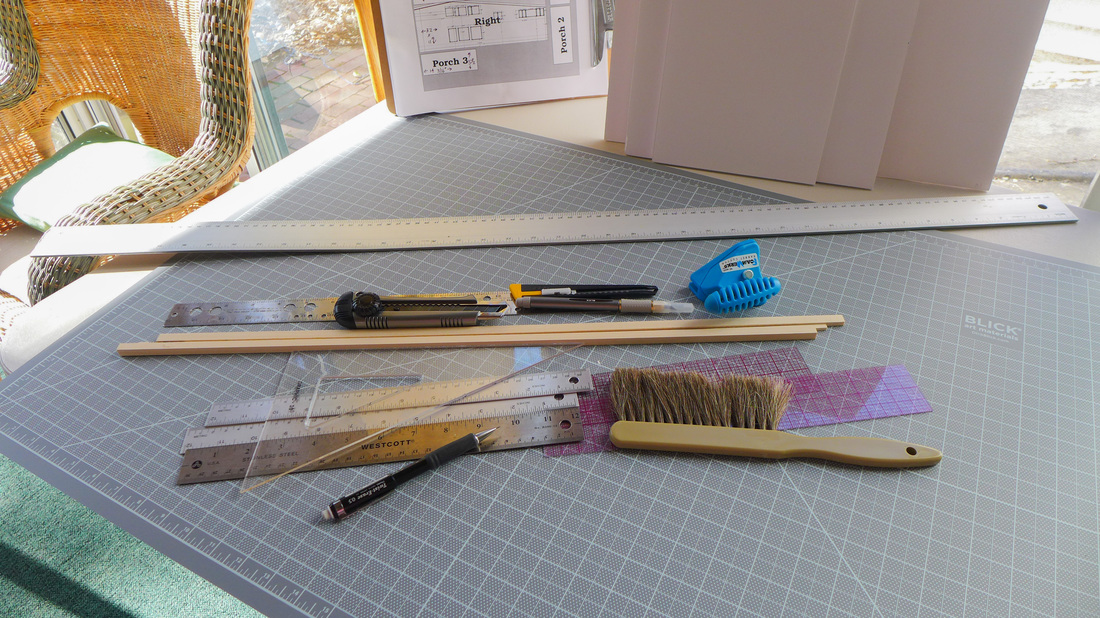
- Freehand line drawing or cuts even guided with a straight edge over long distances are difficult to get correct and aligned. In particular for cutting where significant pressure is needed. It is better to step up a bit and spend more money on tools that are meant for this task (like the series of FoamWerks foamboard cutters.
- Elaine Doran gave me some very good advice: settle on one type of decoration and use it throughout. At one point, I was considering creating siding out of various types of thin wooden strips stained to the color of the siding on the house. Then I started exploring the windows and doors using photographs pasted to a stiff thin board, with a layer of thin plexiglass and a wooden frame to be applied on top of the wooden siding. After several attempts at creating these model windows, on a lark, I tried to see what I could create entirely in a photo editor printed on paper and affixed to the side of the foam core. The results from my consumer grade ink-jet printer were very promising, especially after I experimented adding strong shadows derived from trompe l'oeil artistic techniques. When printed by a local printer on semi-gloss paper, this form of modeling the details of windows and doors is very realistic. These experiments lead to the following summary observationL
- High resolution photography combined with high resolution printing on heavy semi-gloss paper is an effective technique to cover surfaced in models. When combined with trompe l'oeil artistic techniques, very nice models can be created with very effective use of time. These models do not have the same "miniature" characteristics of models built with discrete parts, but they have a unique realism.
So, now I have taken apart all of the tests and experiments and am about to measure and cut the entire model again, this time armed with the things I learned since the middle of April.
May 3, 2015: Parts of the model beyond the house
One thing that distinguishes the houses in the Peacock Farm Rd. area of Lexington is that the houses are built into a hilly terrain with lots of features to look at besides the house. In some sense, the houses do not overwhelm the rest of the area. But, I don't want to over state this because with the density of building, there is still no question that like the rest of Lexington this is a relatively build up residential area.
In any case, in addition to the house, there are several other features I would like to include in this model. Again, taking the advice of Elaine Doran, I am not going to mix modeling techniques and so with few exceptions I am sticking with foamcore 2D representations of most of the extra features. Here are some of the extra features that I am thinking about:
In any case, in addition to the house, there are several other features I would like to include in this model. Again, taking the advice of Elaine Doran, I am not going to mix modeling techniques and so with few exceptions I am sticking with foamcore 2D representations of most of the extra features. Here are some of the extra features that I am thinking about:
- Foundation level shrubbery
- Trees of various heights and types
- Period automobiles for the driveway
- Period dressed people representing the occupants of the house
- Earth berms that were created on the left and street sides of the house and carport
May 22, 2015: It's Been Awhile
Between May 3rd and now, I have addressed the issues of really building the model. I.e., it's time to get serious and finish this puppy. This has involved:
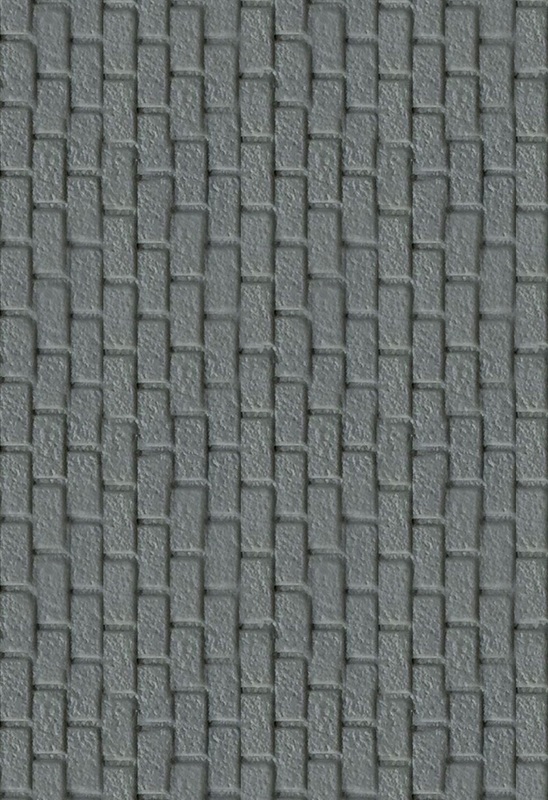
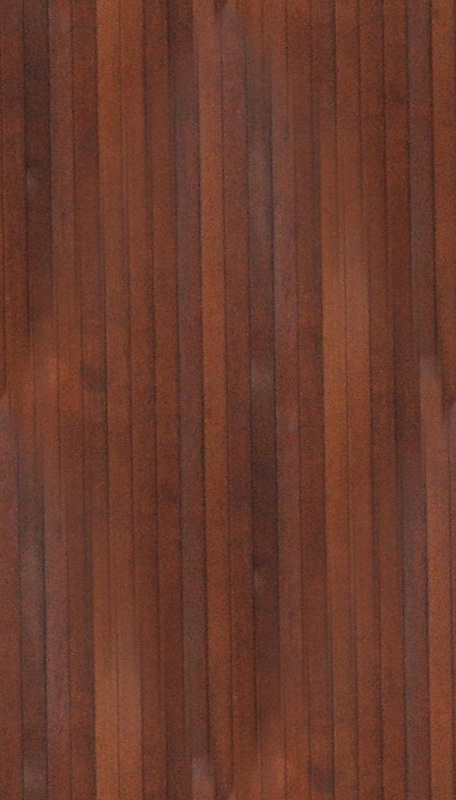
For example, here are samples of the siding, roofing, driveway and mulch materials:
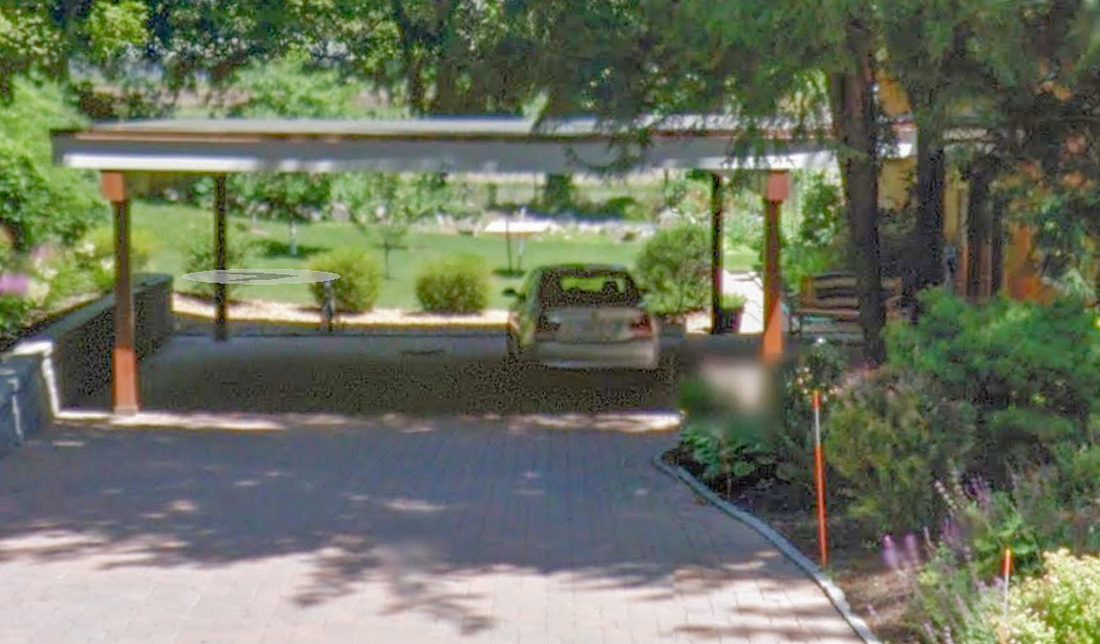
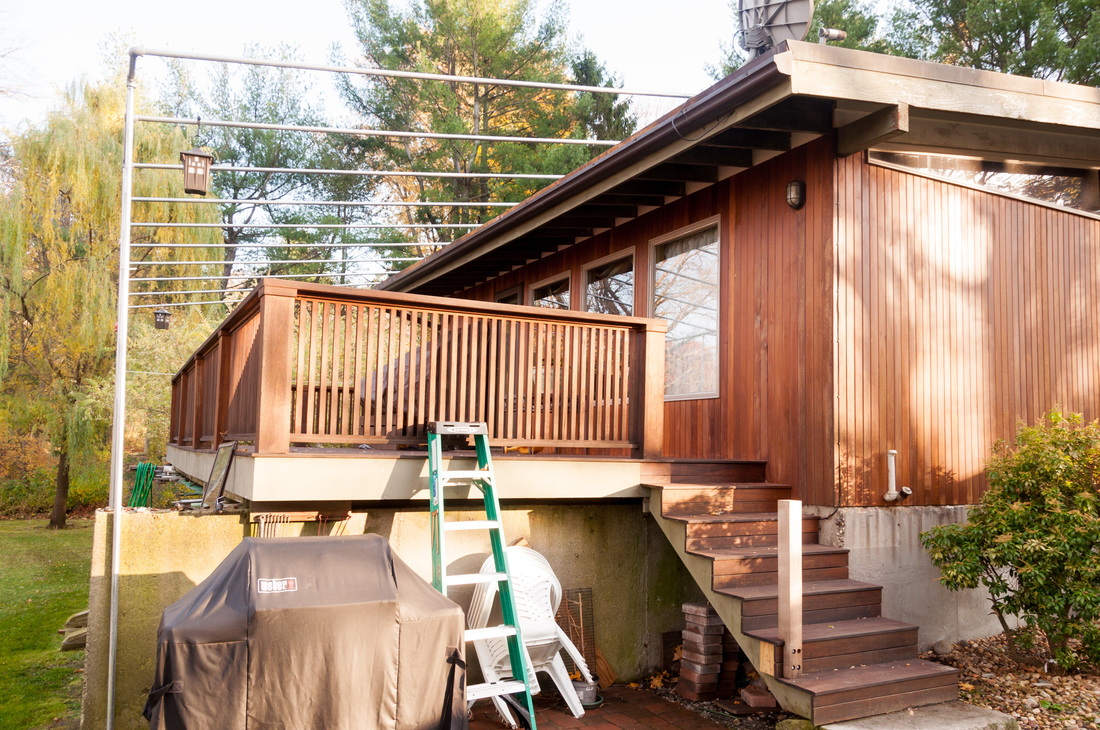
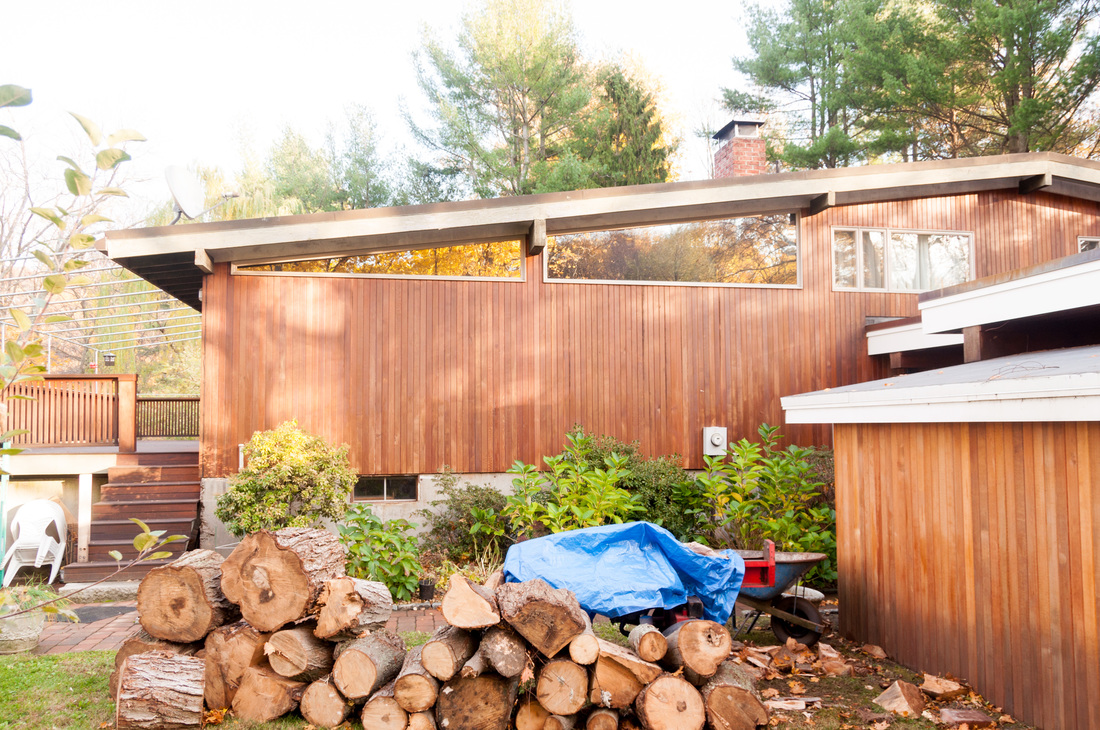
- Retaking photos of the house, making sure I have good photos of each of the features of the house, including the carport and shed, the windows and doors, ground covers (driveway, front door patio), terrain, and anything that didn't correctly register with me on my first photo tour (in particular, the details of the rear entrance at the back of the house).
- Lessons Learned: It takes several passes of looking at an existing structure to see all of the features. Photographs are a good, but not a perfect way of helping in this area because photos are static and don't anticipate looking at things that require detailed exploration. I've learned this the hard way by incorrectly modeling the back of the house, as well as the carport. The back of the house was just complex, messy and an add-on. With the carport, I just assumed that the roofline would mimic the roofline of the house. I was wrong: it is a flat roof which is at the same level as the breeze way and of the same design.
- Making updates to the SketchUp model. Although it turns out that the actual SketchUp model isn't actually needed for the final construction, it has been extremely for the scale model dimension measurements. It is the first place I go when making any changes to the model.
- Creating 'sides" of the model in my image editor (PaintShop Pro, similar to PhotoShop). I created all of these images at 600 dpi -- probably overkill, but at least I have the necessary resolution to do anything I need to do with them.
- After consulting with Lexington Graphics, I have settled on printing on 12" x 18" sheets of 100 lb cover stock on their Xerox Color 700 Digital Press.
- I will use some of the printed images as construction material that is cut in sheets of various lengths and widths as I build up the model from foam core. So, for example, I will print 6 sheets of roofing and then cut it to fit the various roof surfaces. Other printed images (the sides of the house and the inside of the shed are images built up out of siding image overlaid with various windows, and concrete surfaces and well as the shadows such windows and doors would cast. Then this side is cut to shape and applied to foamcore.
For example, here are samples of the siding, roofing, driveway and mulch materials:
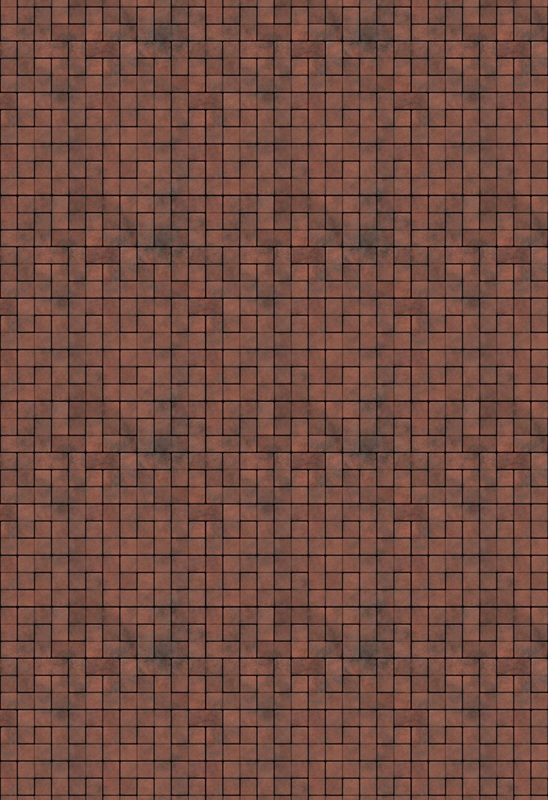


You can buy modeling materials such as these made out of plastic sheets moulded in relief, but they are generic and not as close the the actual house as these printed sheets of material.
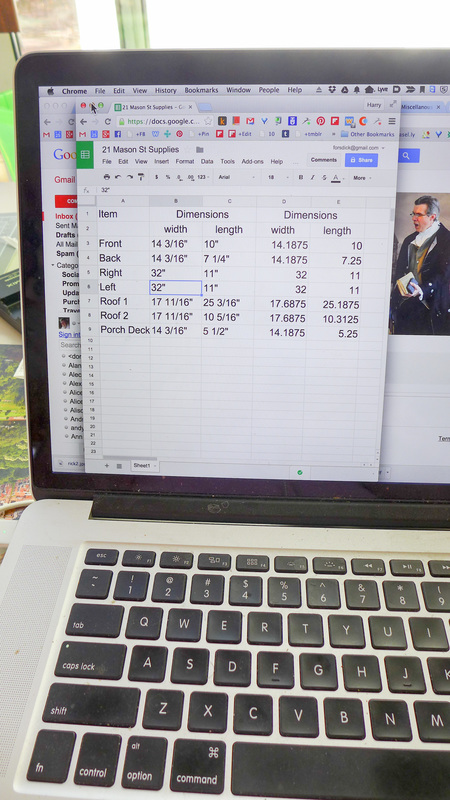
The other types of printed images are the four sides of the house. Here is one side which is 32" wide and must be printed on 2 12"x18" sheets. I am worried about how to make the join in the middle without seeing a seam. The roofs are similar surfaces that will need to be formed out of multiple 12"x18" sheets .
The other types of printed images are the four sides of the house. Here is one side which is 32" wide and must be printed on 2 12"x18" sheets. I am worried about how to make the join in the middle without seeing a seam. The roofs are similar surfaces that will need to be formed out of multiple 12"x18" sheets .
At this point, I will do the following steps:
- Paste the four surface sides of the house to foamcore board in their original untrimmed 12"x18" dimensions (the long sides are printed on 2 12"x18" sheets and thus must be carefully seamed together).
- Paste the surfaces of the roofs to foamcore board cut larger than dimensions of the 5 roof segments (2 for main house, 2 for carport, 1 for breezway. Again I will have to piece together multiple 12"x18" roof surfaces.
- In general, if I had to do this again, I would have printed the larger pieces on one continuous sheet of paper which LexGraphics can do.
- Paste the upper surface of the porch deck to a piece of foamcore cut larger than the dimensions of the deck. Paste unprinted white 100 lb cover stock to foamcore cut larger than the combined dimensions of the other 5 surfaces of the deck platform. These 5 surfaces can be cut so that a single cut produces the edges of two pieces.
- The roofs all need to be made from multiple thicknesses of foam core (or built as a rectangular box) with the roofing material pieced together on the top and plain white paper applied to the edges. The bottom of the main roof and the shed roof can be white also. The bottom of the carport and breezeway roofs is the same as the house siding.
- The beams on the house and carport roofs and and support posts on the porch, breezeway and carport will be made out of multiple layers of foamcore glued together and then covered with house siding material. Some posts may have a band with a shadow around the foot of the post.
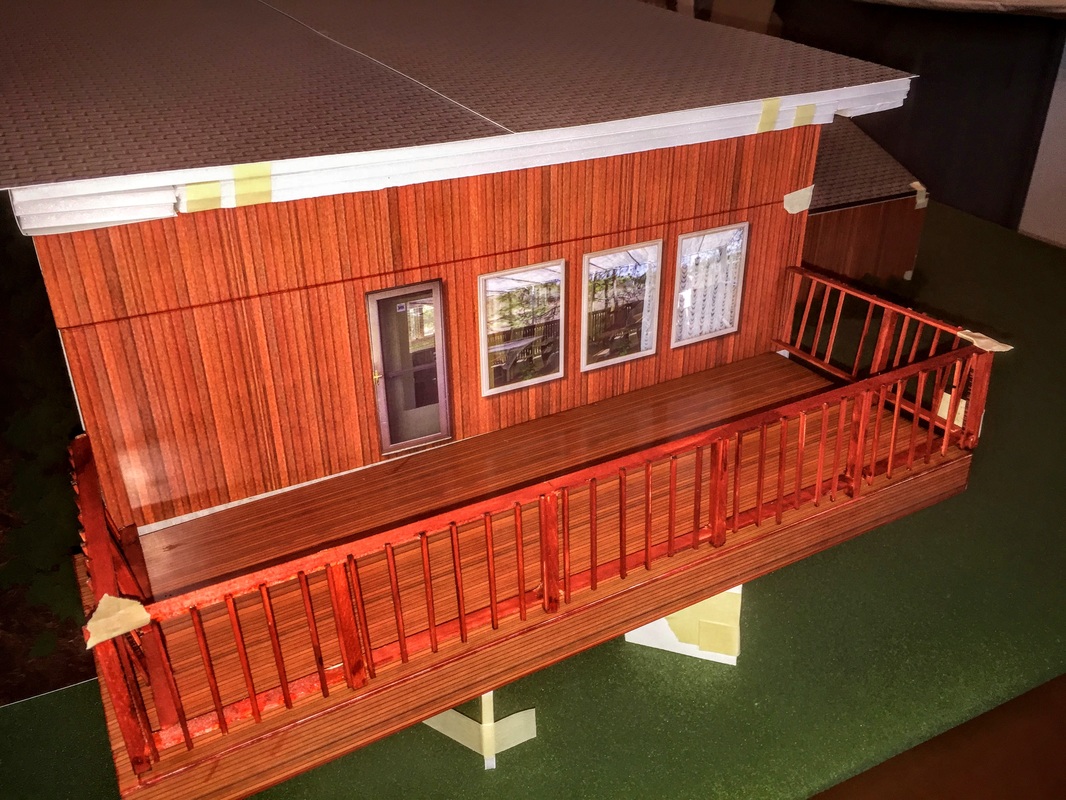
May 31 The railing for the deck
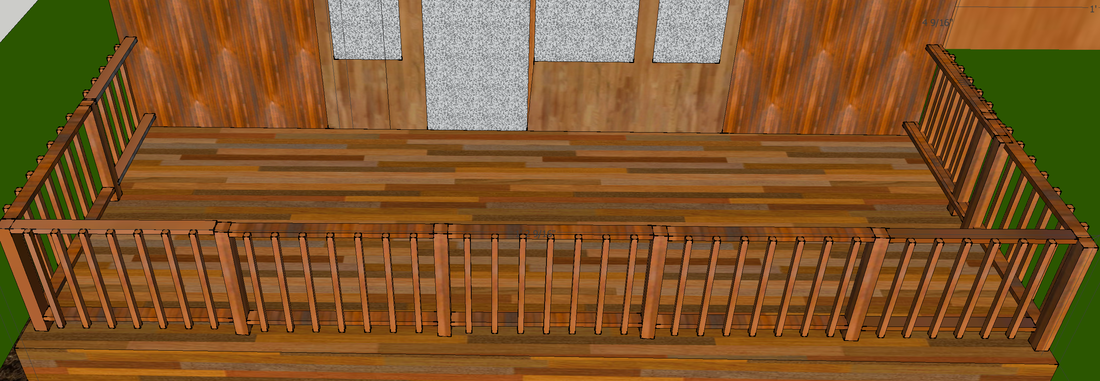 | 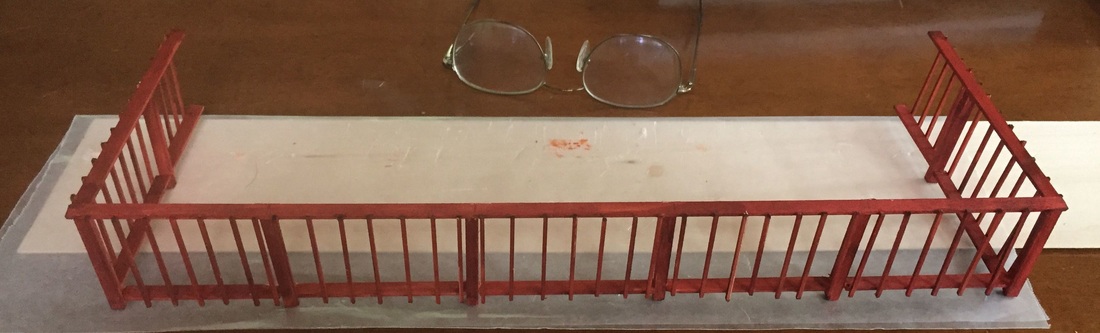 |
My first attempt at the railing for the porch. I built it out of basswood that is found commonly in art / modeling stores. It is hard, but easy to cut and comes in all sorts of dimensions. Instead of building this as 9 separate segments as you would in real life, I decided to build it as three portions (one long, 2 short). After thinking that superglue would be good to attach the little components, instead I found that standard Elmer's white glue worked the best.
Prior to cutting and assembling, I colored the wood with a Copic Sketch E09 (Burnt Sienna). marker. I just discovered these amazing pens are refillable with Copic alcohol+pigment in over 350 colors. They are perfect for staining wood parts to a model, as well as touching up cut edges in paper that show the white color of the paper. Unfortunately, I discovered that Copic EO9 Burnt Sienna color is not correct -- it comes out with too much red. Instead I will have to order online (because the Dick Blick store near Fenway Park carries a lot, but not all of the colors in the Copic line of markers). As it turns out, to get the color of the model, I probably should use two colors, but I'm not sure I want to do that. In any case, something lighter and with more brown is probably the right color.
So, it looks like I will be building a second railing to get it right. I'll see how it looks on the current deck, and decide later whether or not to rebuild and recolor a new railing.
June 3, 2015: Final Design
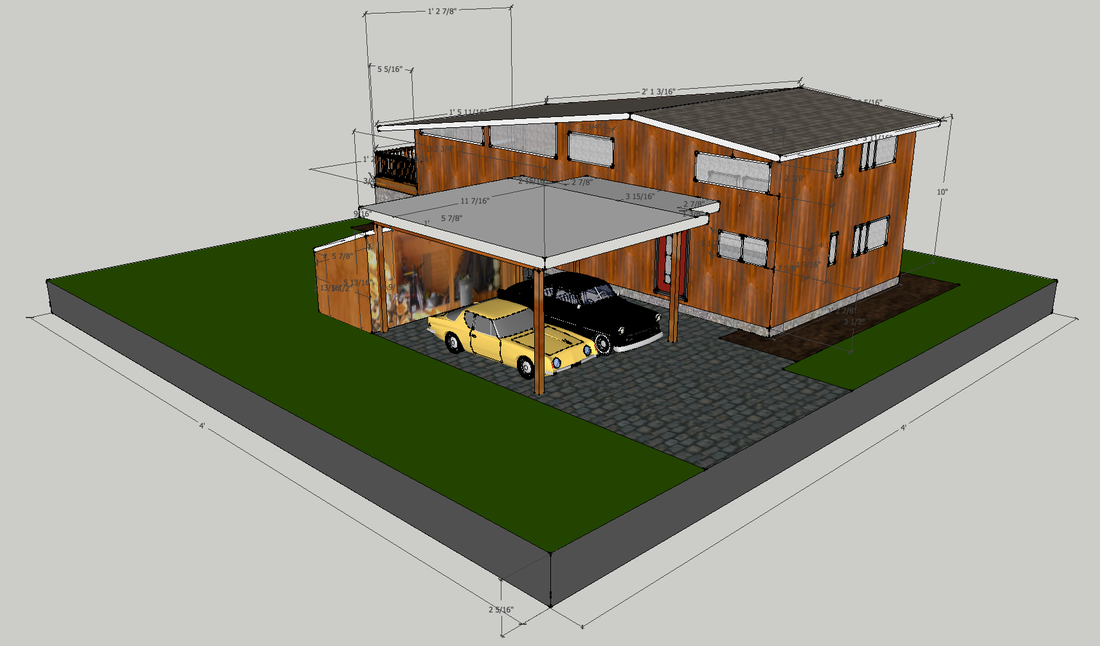 |  |
At some point, you've got to stop. Actually I stopped making lots of changes a couple of weeks ago, but here are two snapshots of final design.
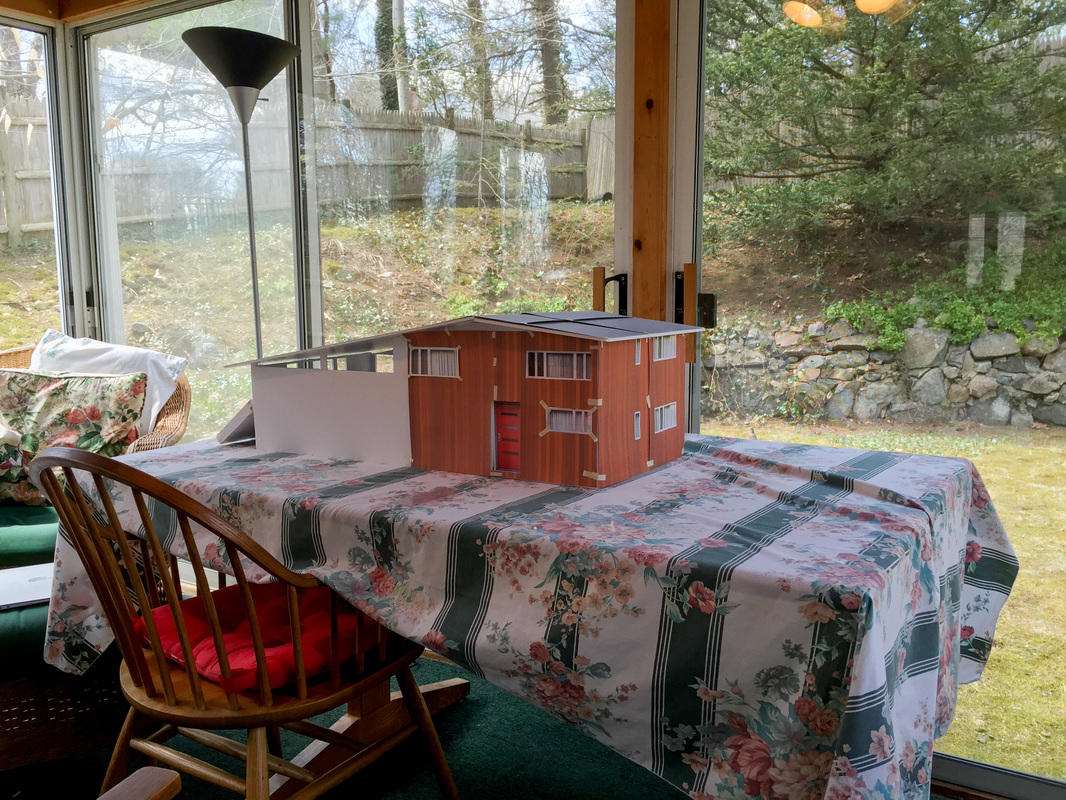
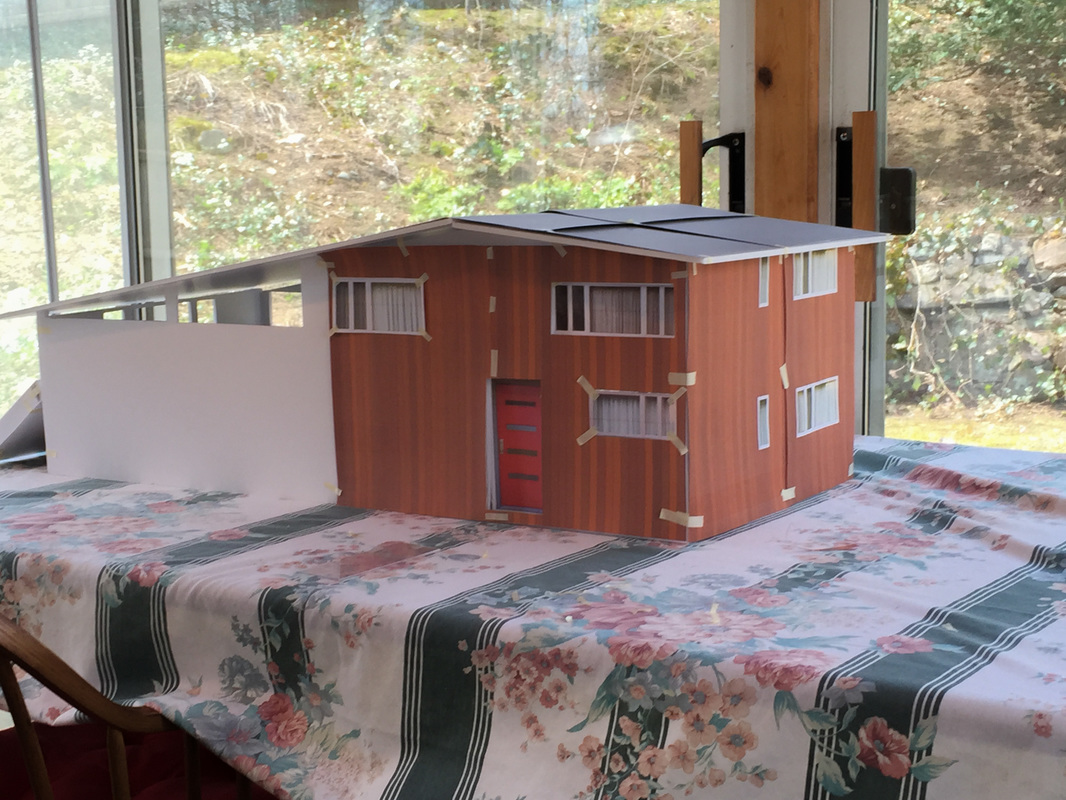
June 4, 2015: She Likes It!
Today, Elaine Doran came over to our house to see the model -- the first time I have shown it off to anybody except Marsha -- and of course the entire Internet through these posts. I was nervous, as anybody who creates things would be. Especially for someone like me who thrives on external affirmation for self worth...
In any case, I first showed Elaine the SketchUp model to give her a preview before we went into the dining room where I had put together the pieces for the first time. Since I put things together with masking tape so that I could preserve my flexibility until the last moment, I wanted her to see the intended look.
It is impressive when you see it all assembled, with masking tape or not. Elaine liked it, and as I suspected needed to see the actual model to appreciate how good it can look. Here are some pictures I took yesterday.

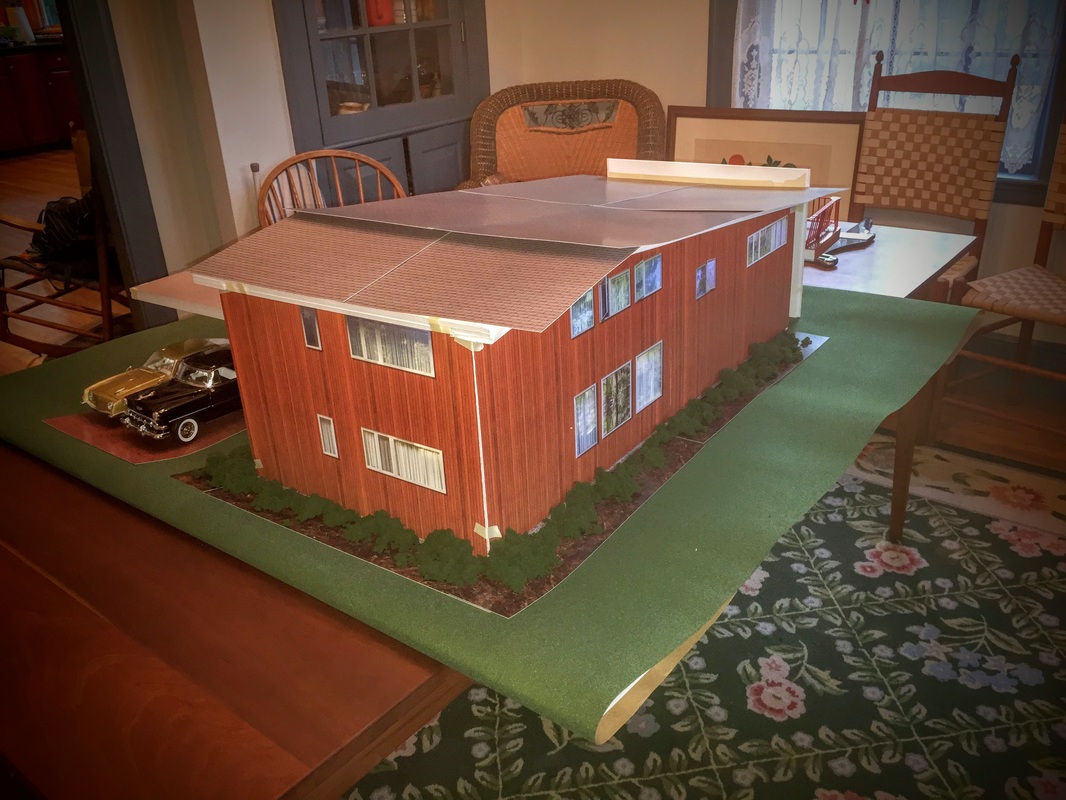
Marsha suggested a couple of days ago that we raise the level of the ground so that viewers see it looking at the house closer to eye level rather than looking down on the roof -- which you are hard put to see when actually looking at the house. I will have to figure out how to do this -- especially since we discovered today that the 48"x48" risers are only 24" high.
June 12: Final Design
This is the final design we have all agreed upon. We will add some small stools to make it easy to look at the model.
June 17: Model is finished!!!
It took a lot more time and effort than I had imagined, but it turned out great. Today, Chris Kaufman came over with his pickup truck, and helped me bring the 4x4x2 foot model over to the Depot in Lexington where Rick Beyer and Elaine Doran helped me assemble everything together. Tomorrow last minute touchups and pictures.

 RSS Feed